 EN
EN  العربية
  Български
  Čeština
  Dansk
Dansk  Deutsch
  Ελληνικά
  Español
  Suomi
Suomi  Français
  עברית
עברית  हिन्दी
  Bahasa Indonesia
  Italiano
  日本語
日本語  한국어
한국어  Bahasa Melayu
  Nederlands
  Norsk
Norsk  Polski
  Português
  Română
  Русский
  Svenska
  Kiswahili
  ไทย
ไทย  Türkçe
  Українська
  Tiếng Việt
  中文
中文 User guide
Payments, partial payments and amount due
Record deposits and instalments against an invoice, watch the remaining balance shrink, and print a payment schedule on the PDF so clients know what is due when.
Not every invoice is settled in one go. A wedding planner takes a booking deposit months before the day, a second instalment in the summer and the balance a fortnight before the ceremony. A builder bills in stages, a designer asks for half up front. Invoice Flow handles this with two separate tools that work well together: a Payments ledger on every sent invoice, where you log each amount as it arrives and the app keeps the remaining balance for you, and an optional Split Payment schedule in the editor, which prints the agreed instalments and their deadlines on the PDF.
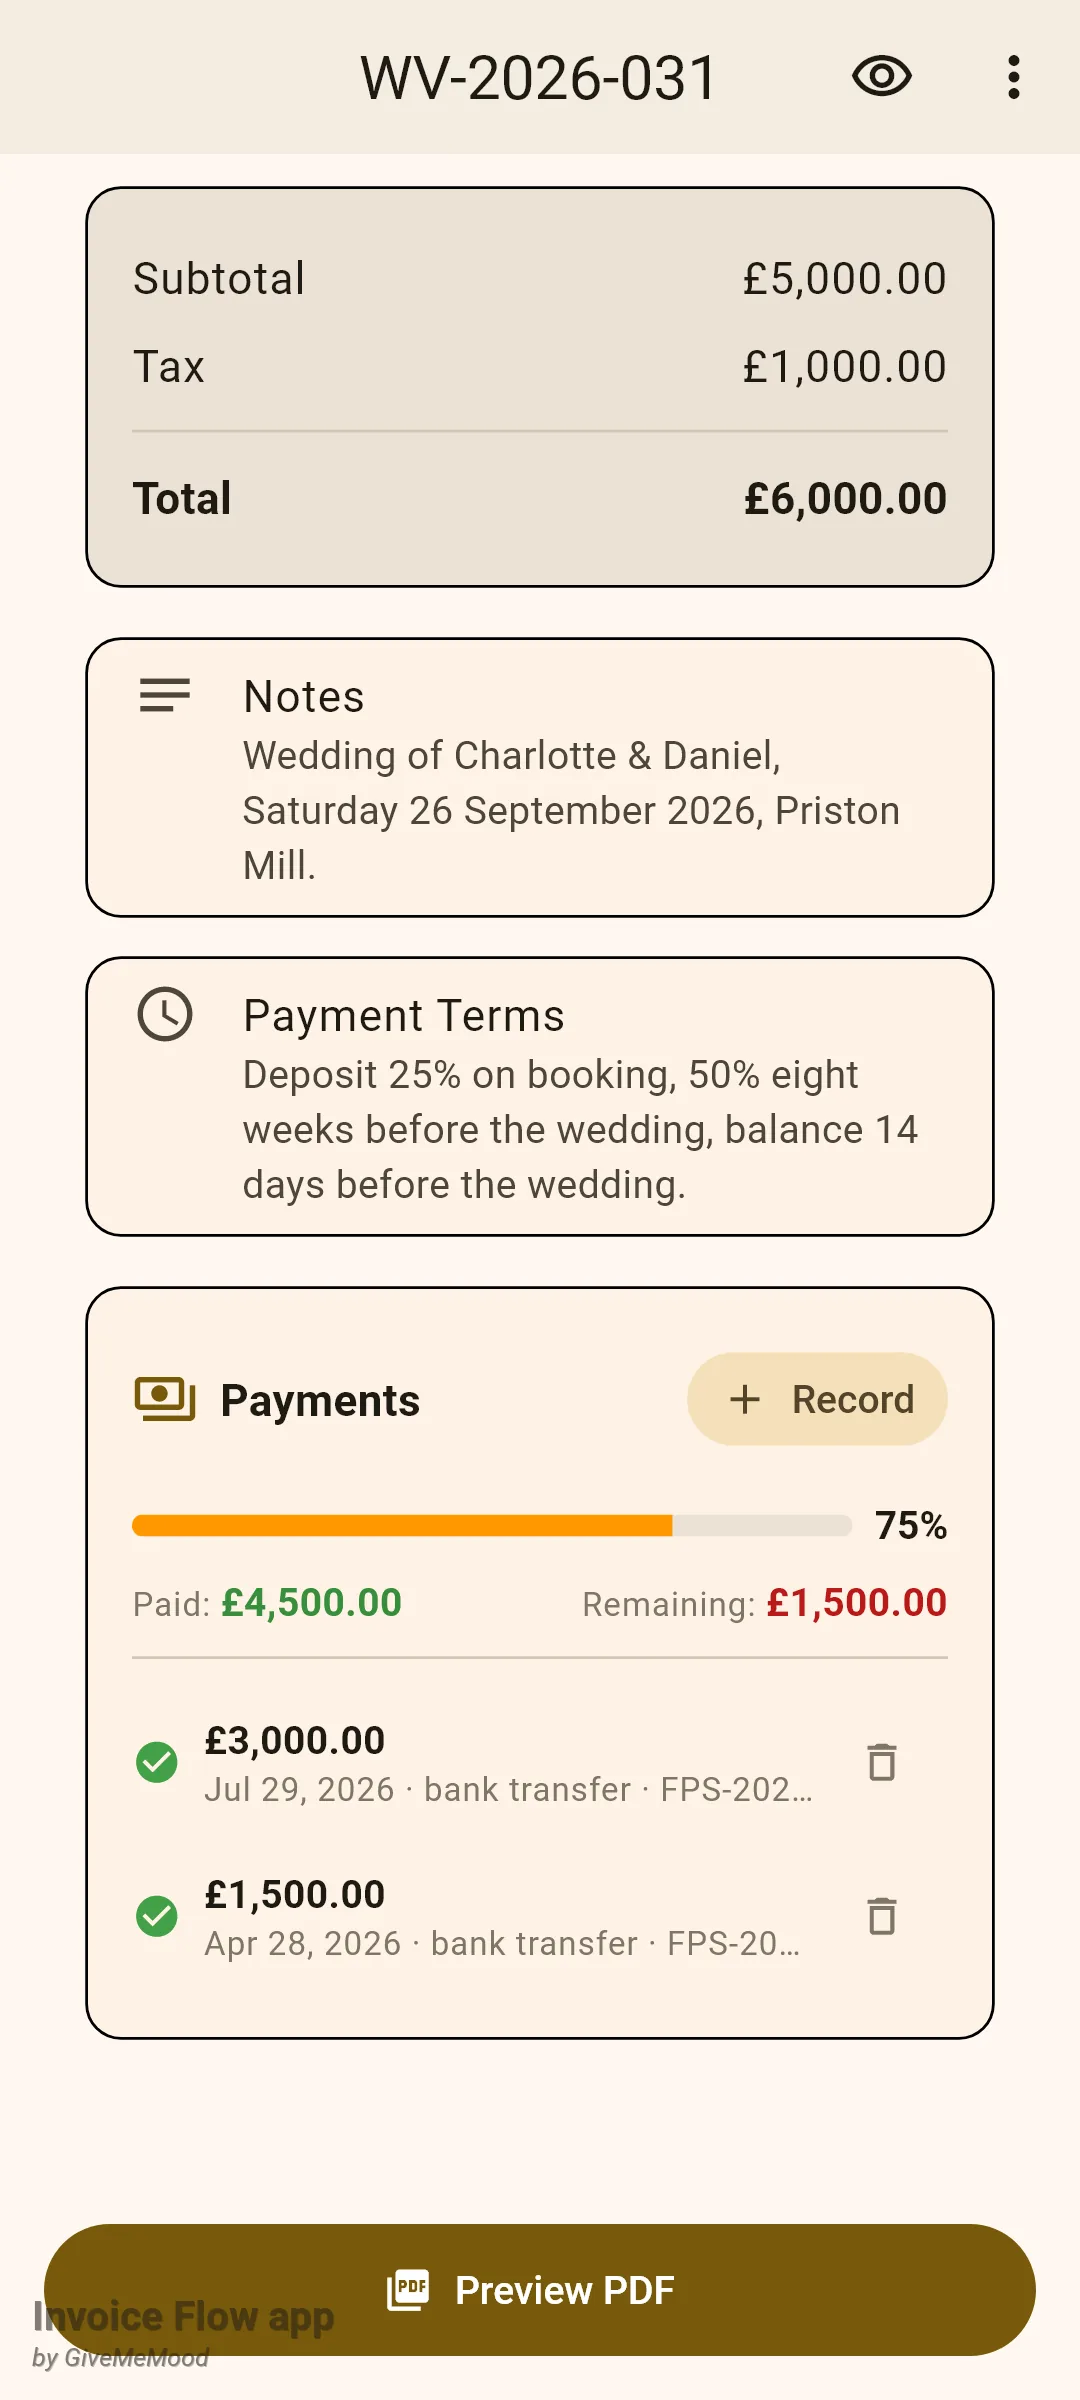
The examples below follow Willow & Vine Weddings in Bath. Their client, Charlotte and Daniel, booked a full planning package for £6,000 including VAT, paid in three parts: 25% on booking, 50% eight weeks out, and the final 25% two weeks before the wedding.
What you see on the screen
Open the Documents tab and tap an invoice to reach its detail screen. Below the totals, notes and payment terms sits a card headed Payments. It only appears for invoices whose status is not Draft or Cancelled, and never for estimates, because there is nothing to collect on those yet.
The card has four parts. A Record button with a plus sign in the top-right corner opens the form for logging a payment; it disappears once the invoice is marked Paid. A thin progress bar shows how much of the total has been covered, with the percentage beside it. The bar is red below 50%, orange from 50% up, and green at 100%. Under the bar a line reads Paid: in green and, while anything is still owed, Remaining: in red. Finally there is the list of recorded payments, newest first, each with a green tick, the amount, and a grey line with the date, the method and the reference you typed. A bin icon on each row deletes that payment. Before you log anything the card says No payments recorded yet.
The Documents list mirrors this. Any invoice that has at least one payment but is not yet Paid gets a small progress bar under the client name and a red line under the total showing the amount still due. The filter sheet (funnel icon in the top bar) has a Partially paid switch that narrows the list to exactly these invoices.
The schedule lives somewhere else entirely. In the invoice editor, scroll down past the signature tile to the collapsed card titled Payment Options. Tap it to expand and you will find a two-way switch: Single Transaction or Split Payment. Split mode is where you define the deposit and instalments; it is described in its own section below.
How to record a payment
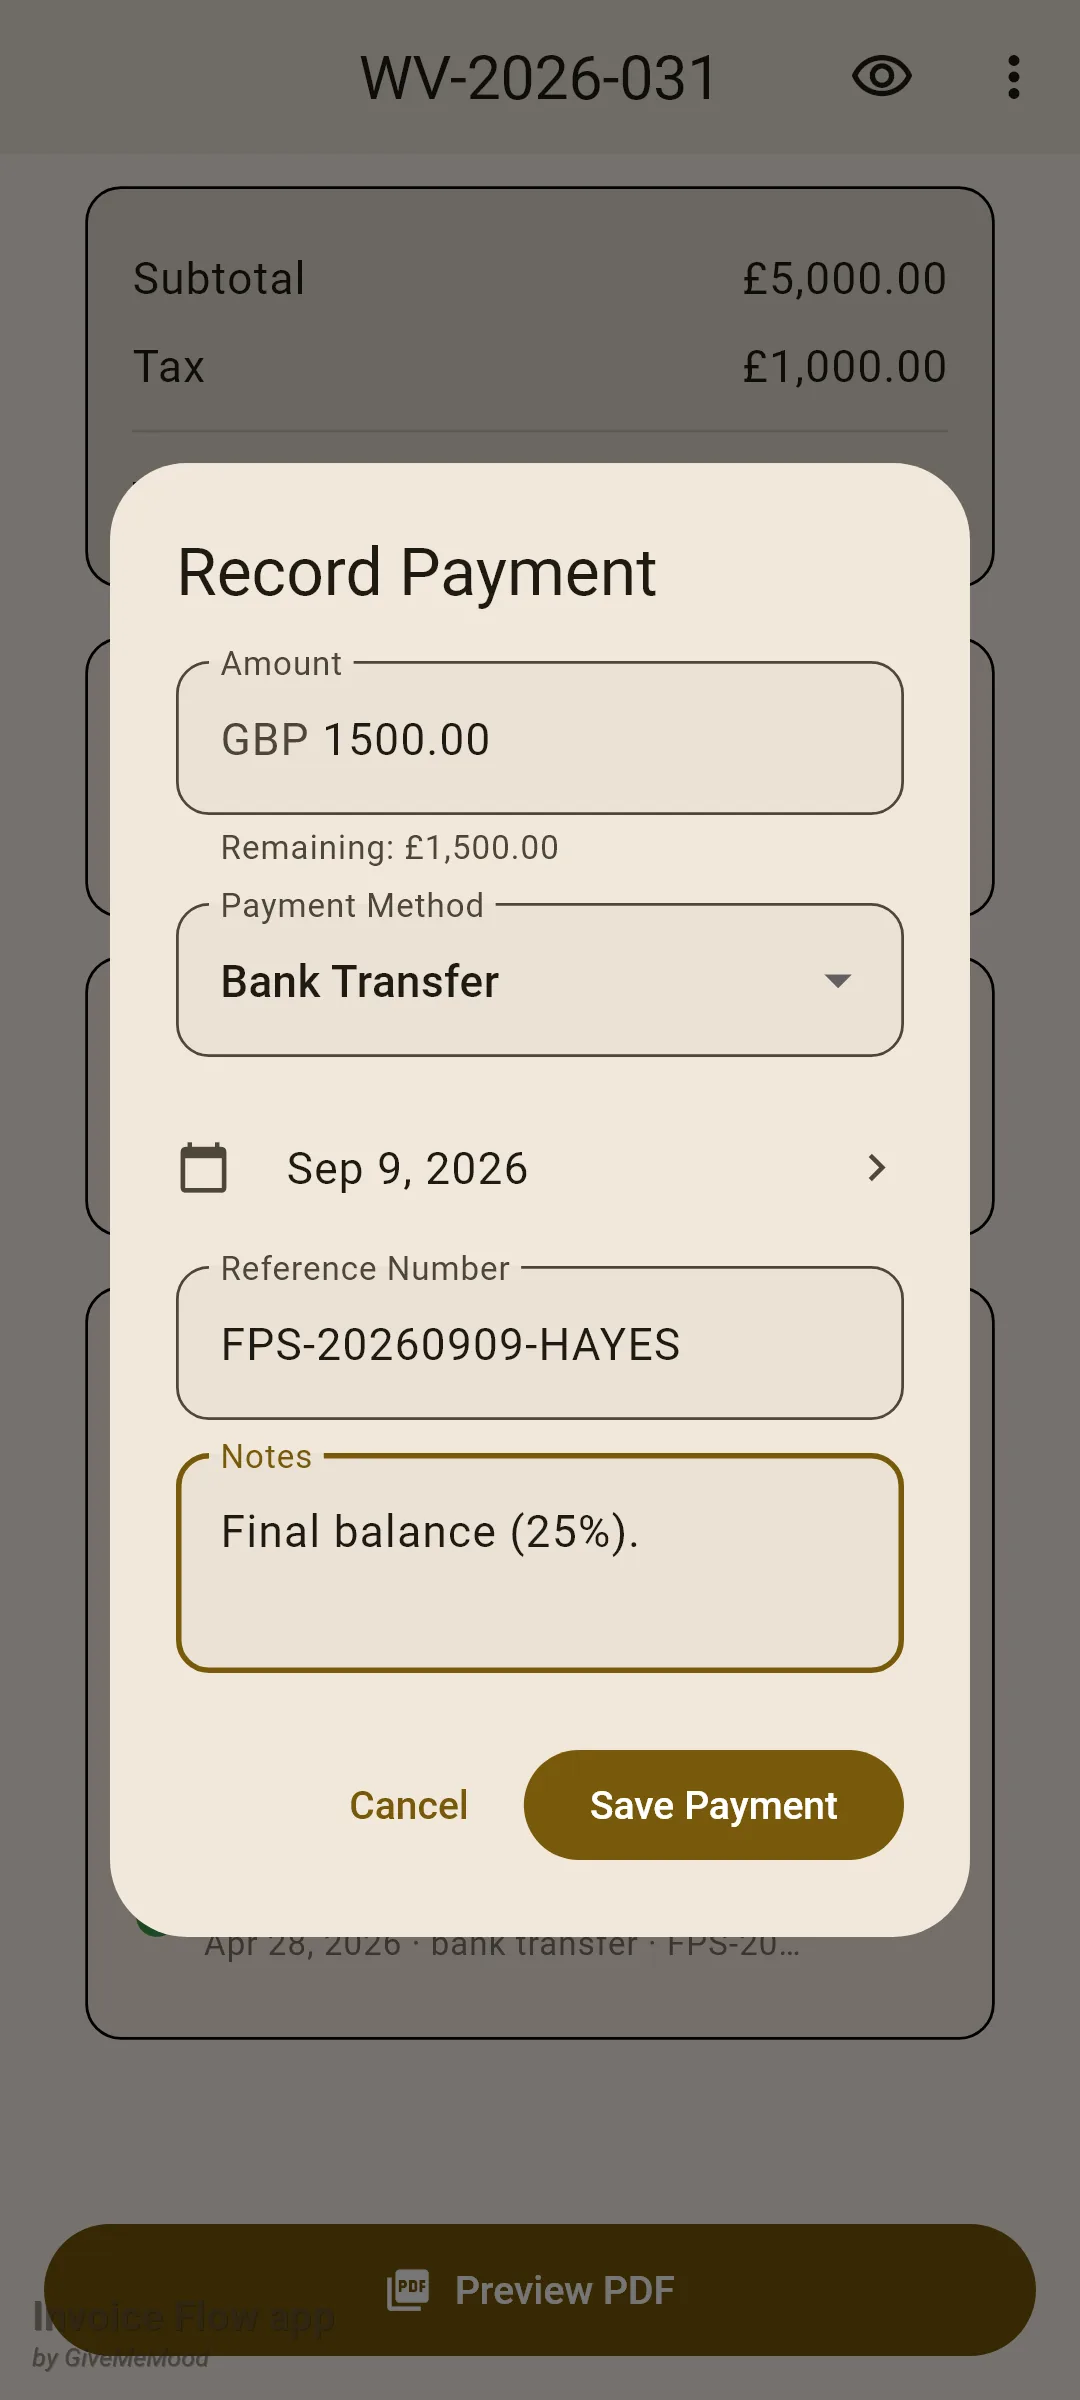
Charlotte and Daniel have just sent the final £1,500 by bank transfer. Here is how the planner logs it.
- Open the Documents tab and tap invoice WV-2026-031.
- Scroll to the Payments card and tap Record.
- Check the Amount field. It is pre-filled with the remaining balance, in this case 1500.00; type a different number if the client paid less or more.
- Pick a Payment Method from the dropdown: Bank Transfer, Card, Cash, Check, PayPal, Crypto or Other.
- Tap the date row if the money arrived on a different day. The picker only allows dates up to today.
- Type the bank or transaction reference in Reference Number, and anything you want to remember in Notes.
- Tap Save Payment.
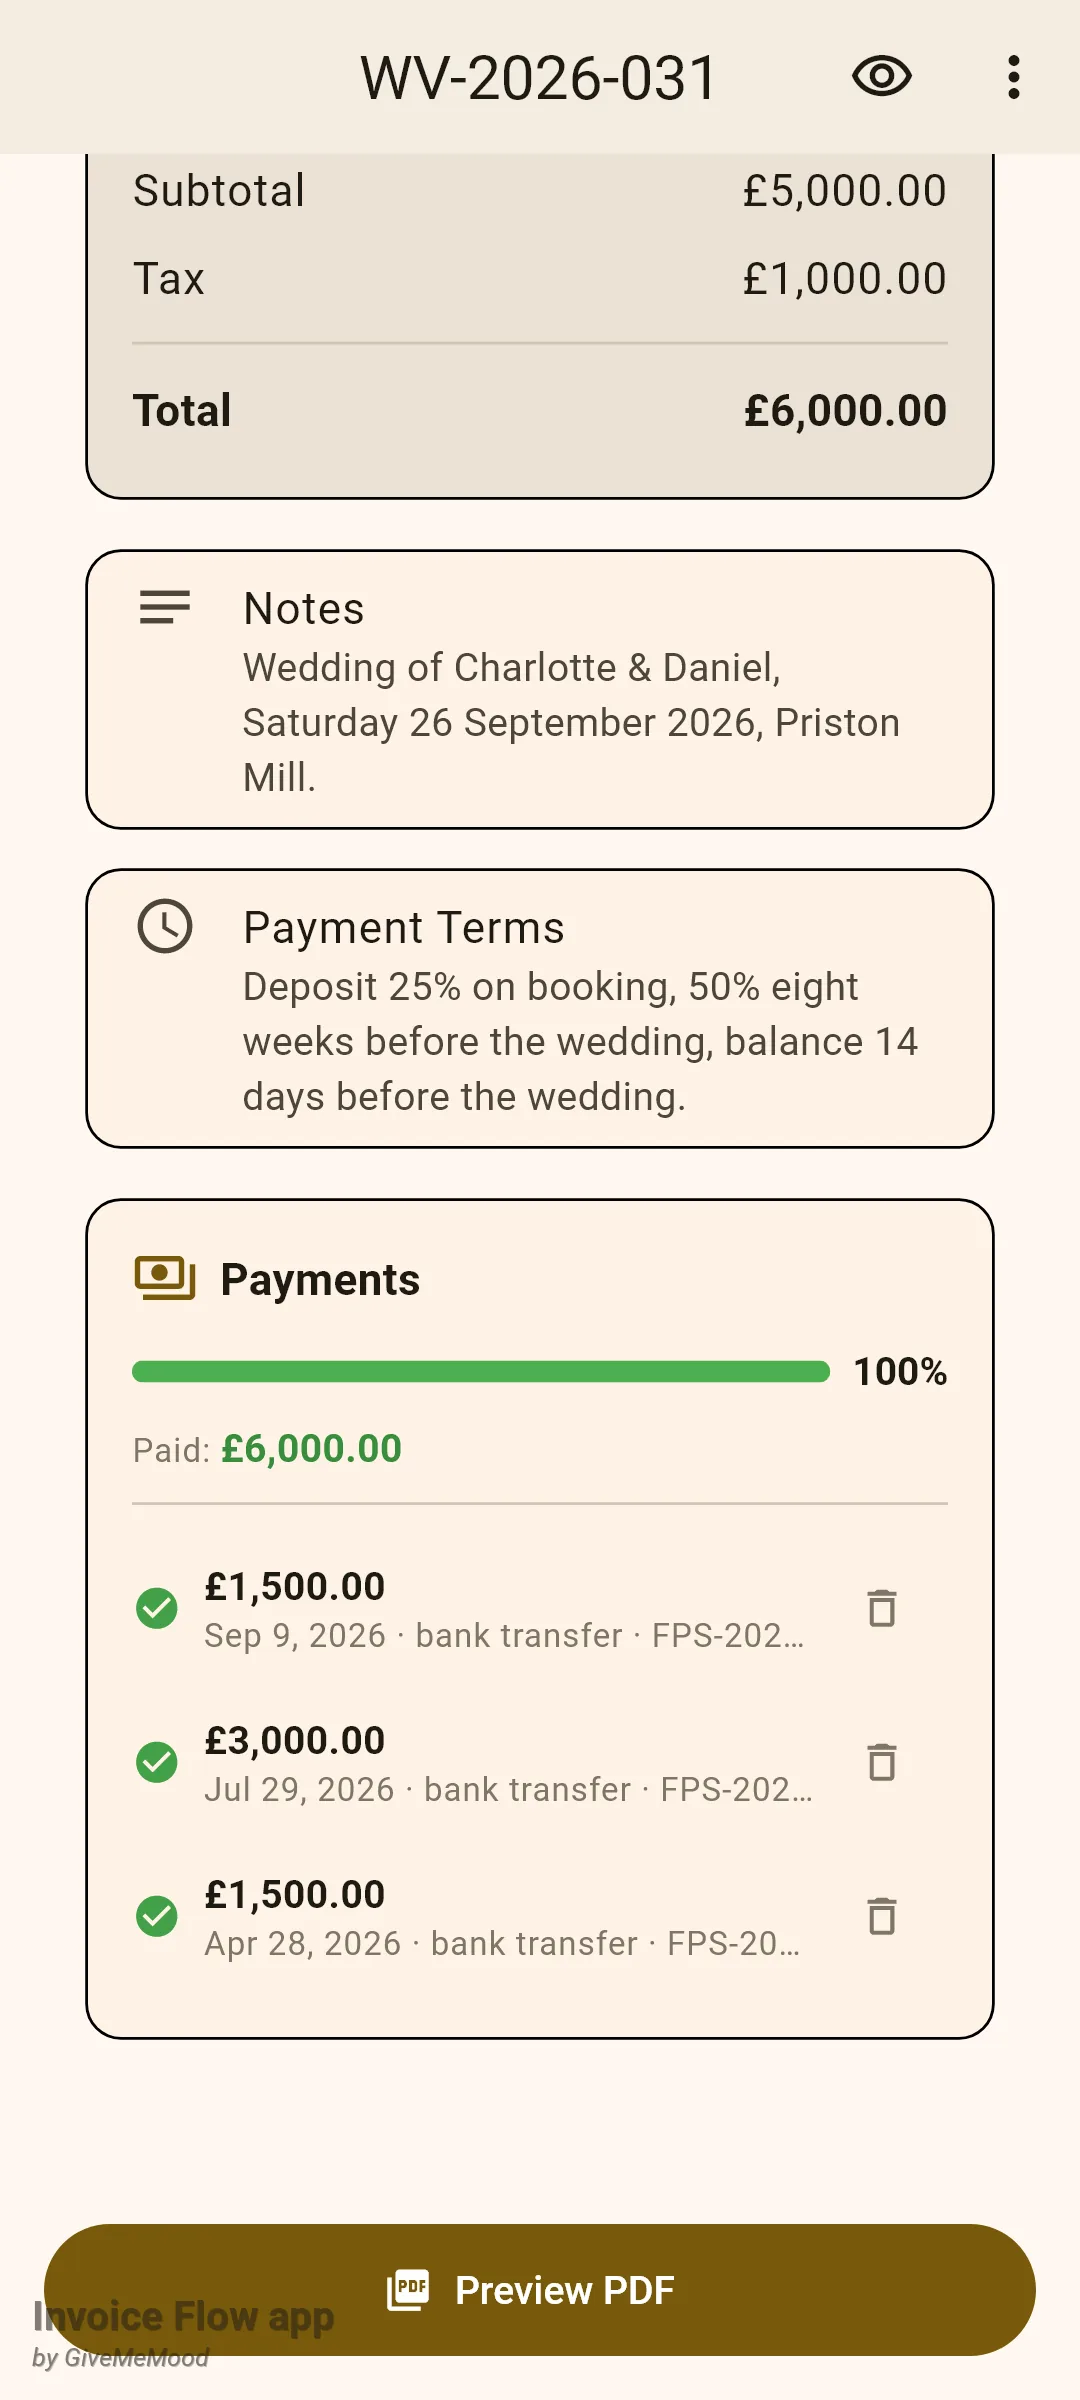
When you save, the app adds the payment to the ledger, re-adds every payment on the invoice, stores the new paid and remaining figures, and refreshes the card. If the remaining amount drops to zero, the invoice status flips to Paid automatically and the paid date is set to now. Because the final balance closed the gap, WV-2026-031 turns green without any further taps, and the Record button goes away.
How to correct or remove a payment
There is no edit form for a saved payment. If you typed the wrong amount, delete the row and record it again.
- On the Payments card, tap the bin icon on the payment you want to remove.
- Read the Delete Payment? dialog, which repeats the amount, and tap Delete (or Cancel to keep it).
- Tap Record and enter the corrected payment.
Deleting recalculates the balance the same way saving does. If the invoice had been marked Paid and the deletion leaves money outstanding, the status goes back to Sent and the paid date is cleared, so the invoice reappears in your outstanding totals and the Record button returns.
How to change the status by hand
The three-dot menu in the top-right corner of the invoice detail screen lets you move an invoice between statuses without touching the payment ledger. On a Sent or Overdue invoice it offers Mark as paid and Revert to draft; on a Paid invoice it offers Mark as unpaid; on a Cancelled one, Reactivate. Every option asks you to confirm in a Change status? dialog before it does anything.
- Open the invoice and tap the three-dot menu in the top bar.
- Choose Mark as paid.
- Read the confirmation ("Mark this invoice as paid? Reminders will stop and the client's totals will update.") and tap Change.
- If a late fee is pending on the invoice, answer the follow-up prompt about whether the fee was paid too.
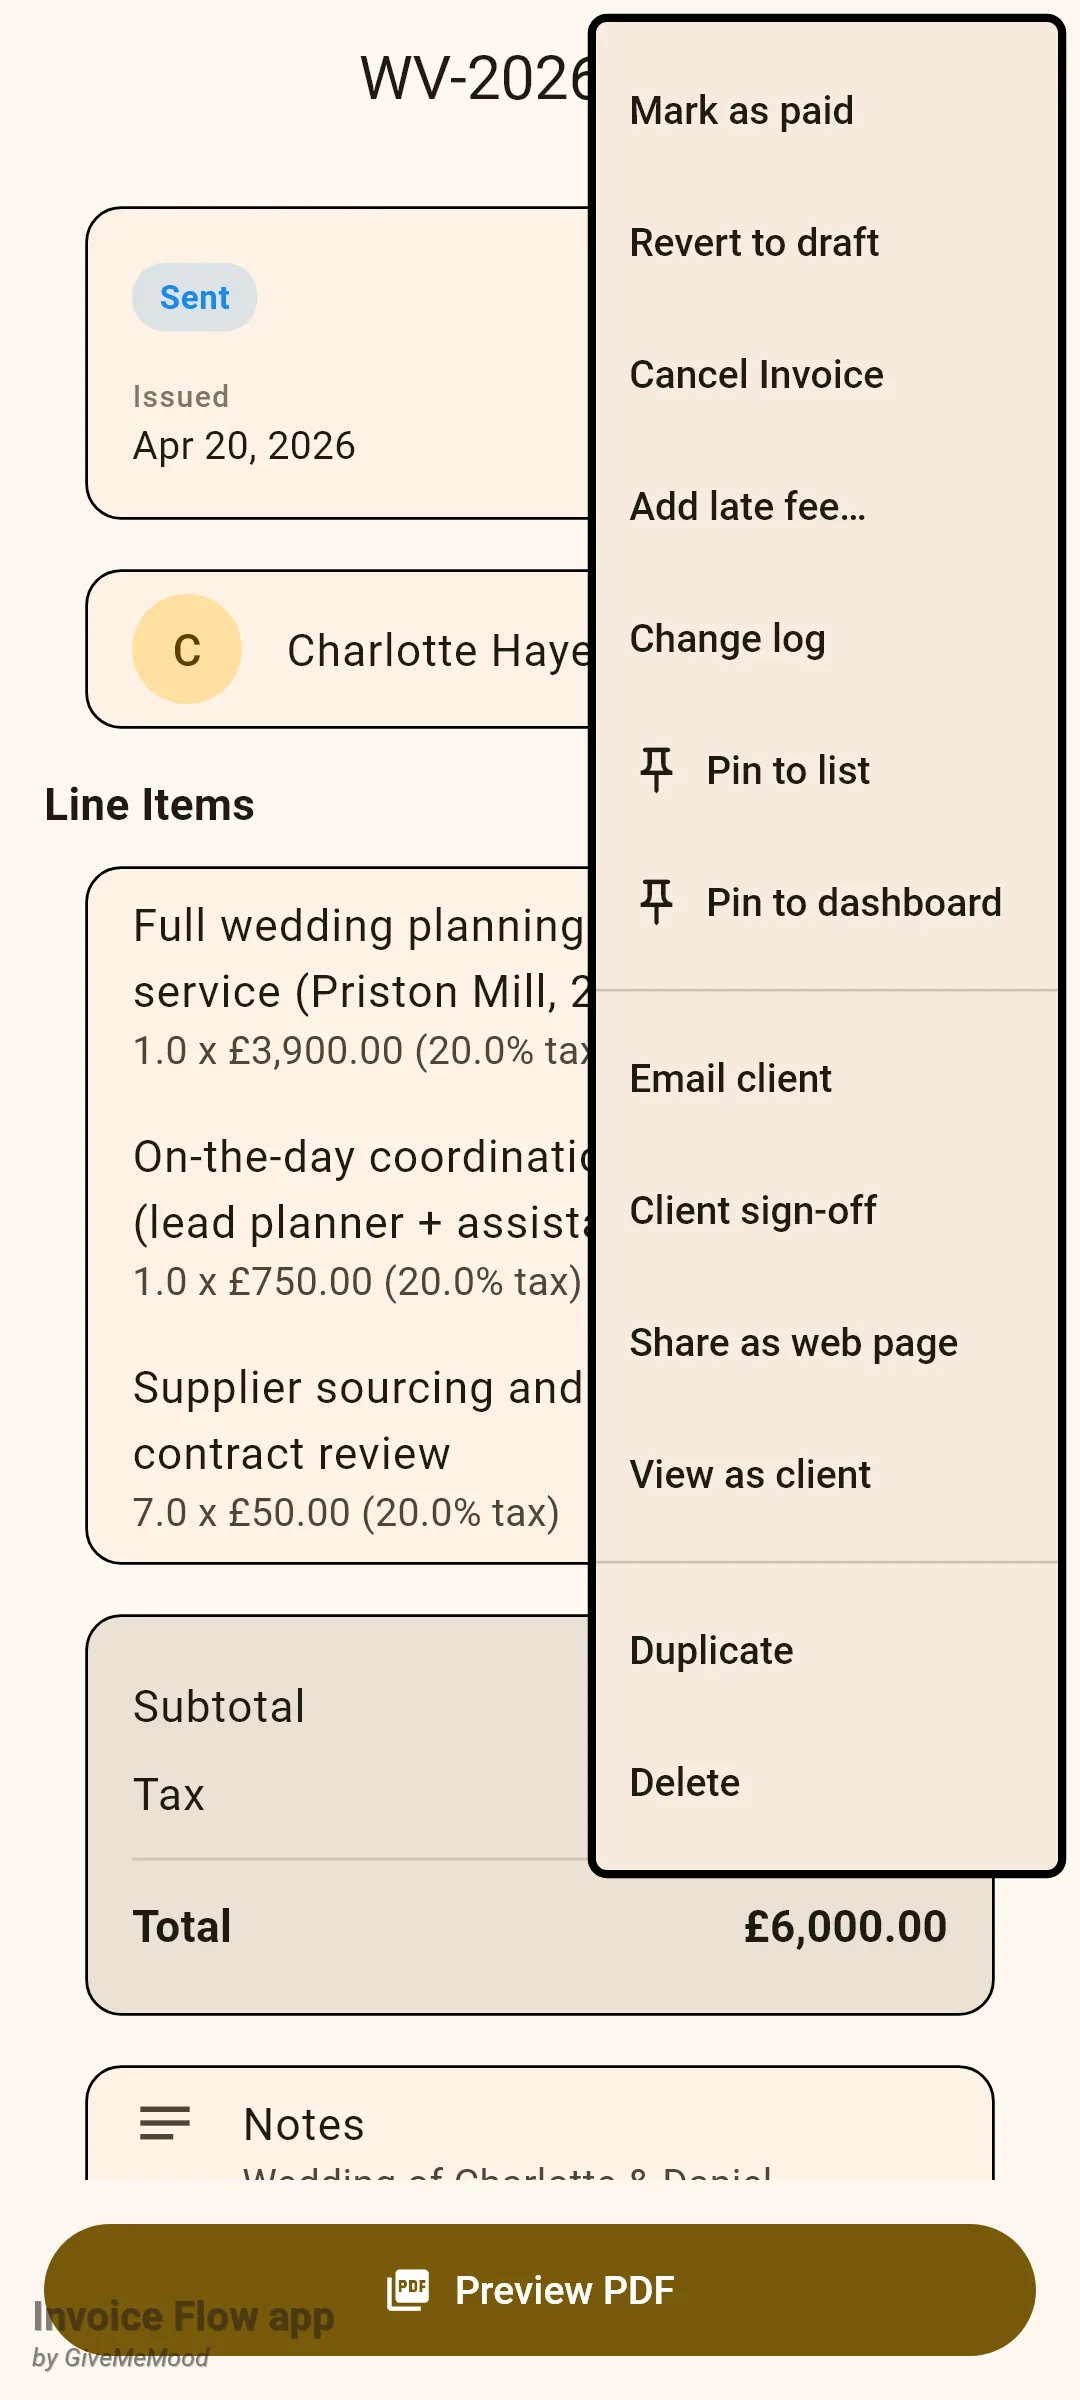
Use Mark as paid when you do not care about the individual transactions, for example a small invoice settled in cash on the spot. Use Record when you want the audit trail of who paid what and when, and let the status follow. Mixing the two is possible but has a side effect explained under Rules and details.
How to show the client what is still owed
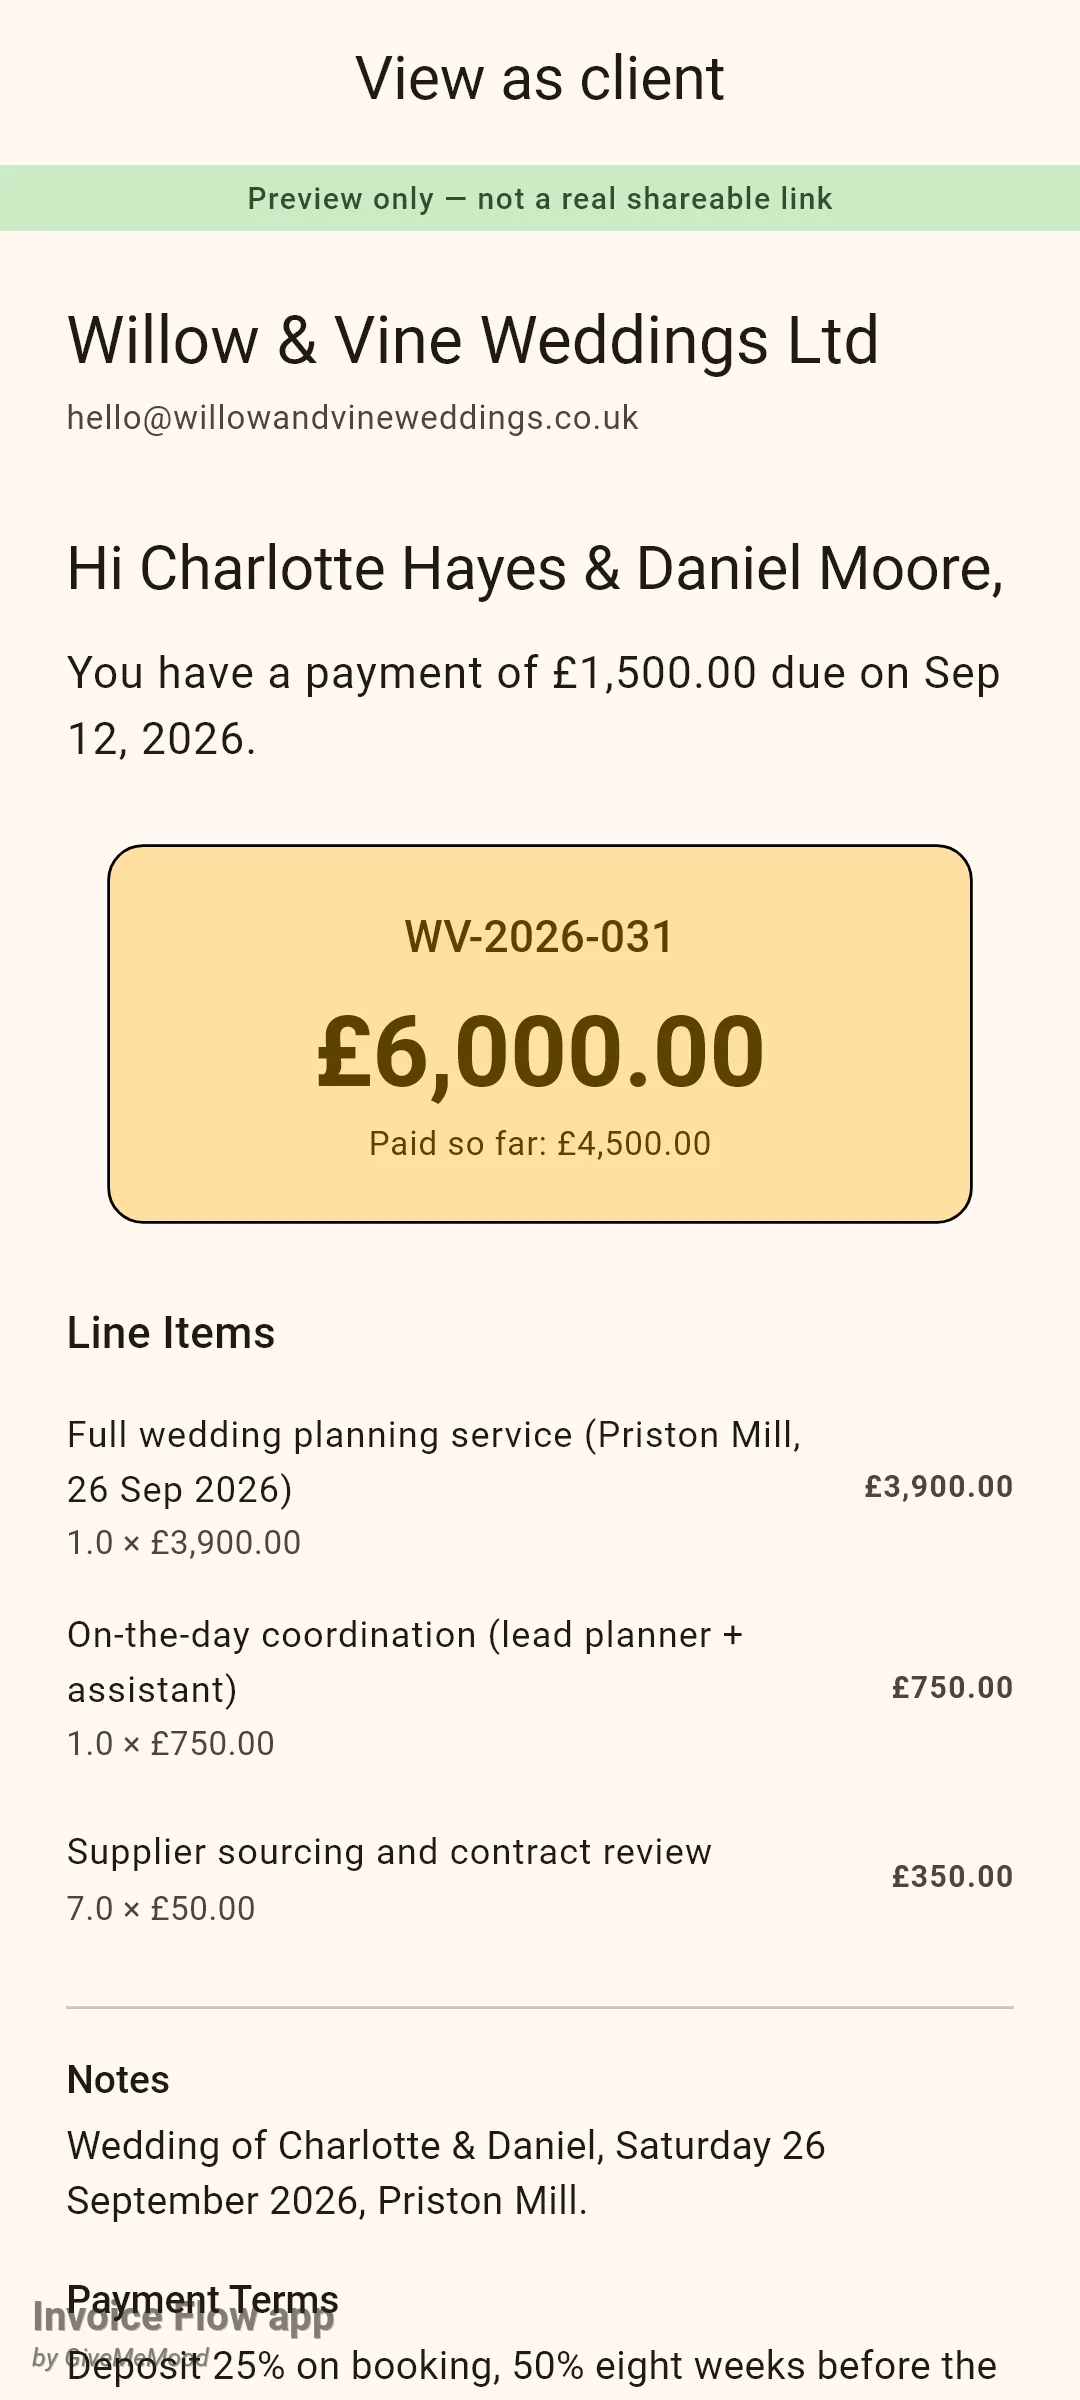
The View as client option in the same menu opens a stripped-down preview of the invoice as the recipient would read it: a greeting, a sentence stating the payment due and the due date, a large card with the invoice number and total, and, once something has been received, a Paid so far line under the total. It is a local preview only, marked with a banner; it is not a link you can send. It is handy for a quick screenshot in a chat with the couple, or simply to check that the figures you are about to email make sense.
How to set up a split payment schedule
The ledger records what actually happened. The schedule states what you agreed. You build it in the editor, ideally while the invoice is still a draft, and it prints on the PDF under the heading Payment Schedule. For Amelia and Josh’s March 2027 wedding, the planner sets up the same 25/50/25 structure on a £4,800 invoice.
- Open the invoice in the editor and scroll down to the Payment Options card; tap it to expand.
- Tap Split Payment. If you had already added a QR code or payment buttons in single mode, the app asks whether to move them into the first payment.
- Tap + Add Payment to create a part, then open it and type a name in Label, for example Booking deposit.
- Enter the Amount. Tap the suffix at the end of the field to switch between a fixed sum in the invoice currency and a percentage of the total; 25 with the percent suffix becomes £1,200.00 on a £4,800 invoice.
- Set From and By dates if the part has a window or a deadline. The By date is shown on the collapsed card and printed as "Pay by" on the PDF.
- Optionally add a payment method or QR code inside the part, so each instalment can carry its own link.
- Repeat for the remaining parts and watch the Allocated line until it reads 100% and Remaining shows zero.
- Tap Save Draft (or Save).
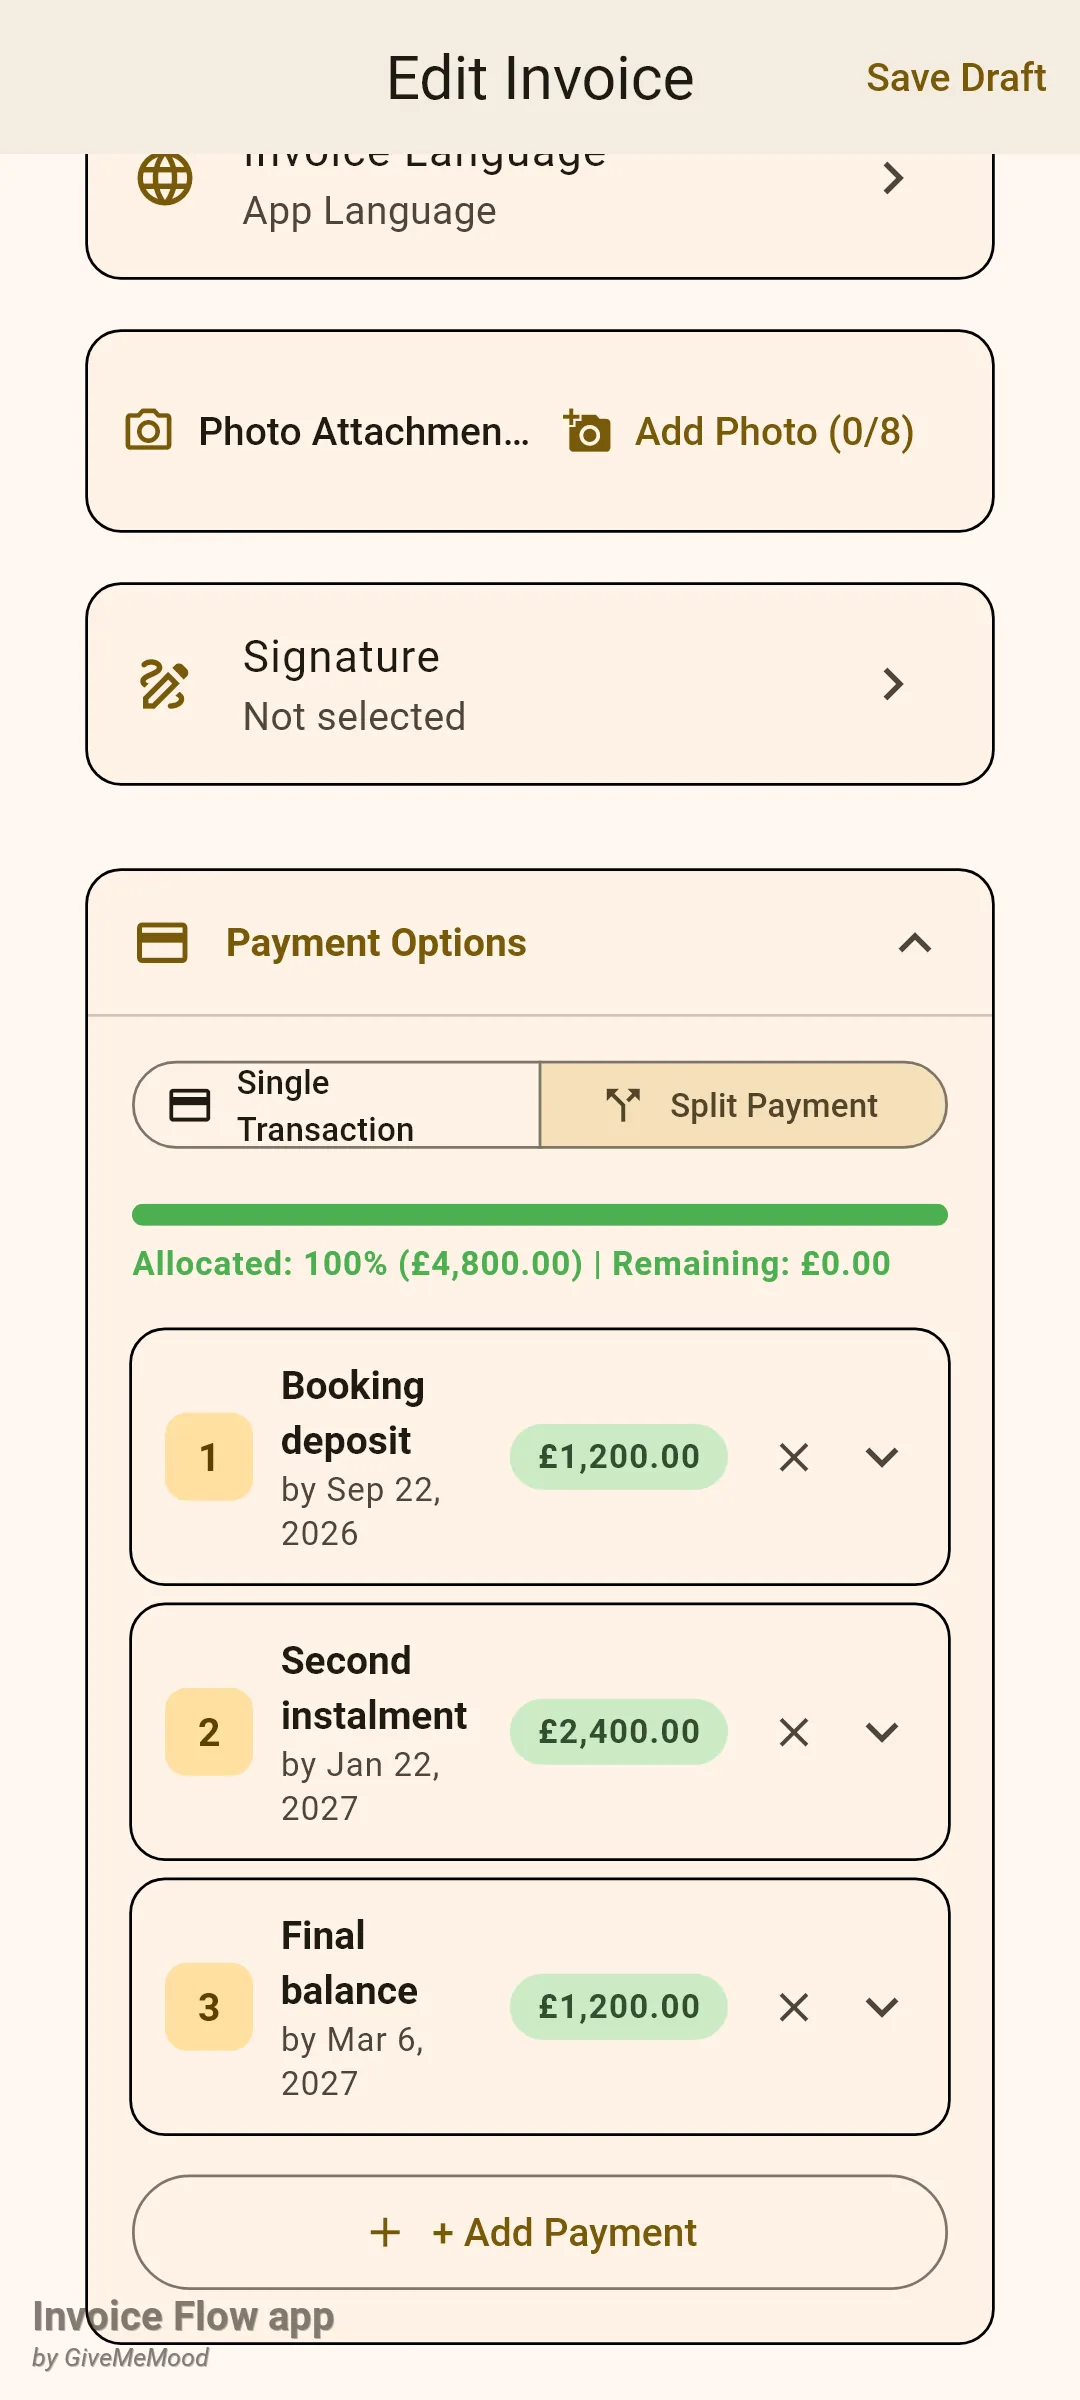
The allocation bar is amber while parts add up to less than the total, green when they match, and red if you have over-allocated. The app does not stop you saving an incomplete or excessive schedule; the bar is guidance, not validation.
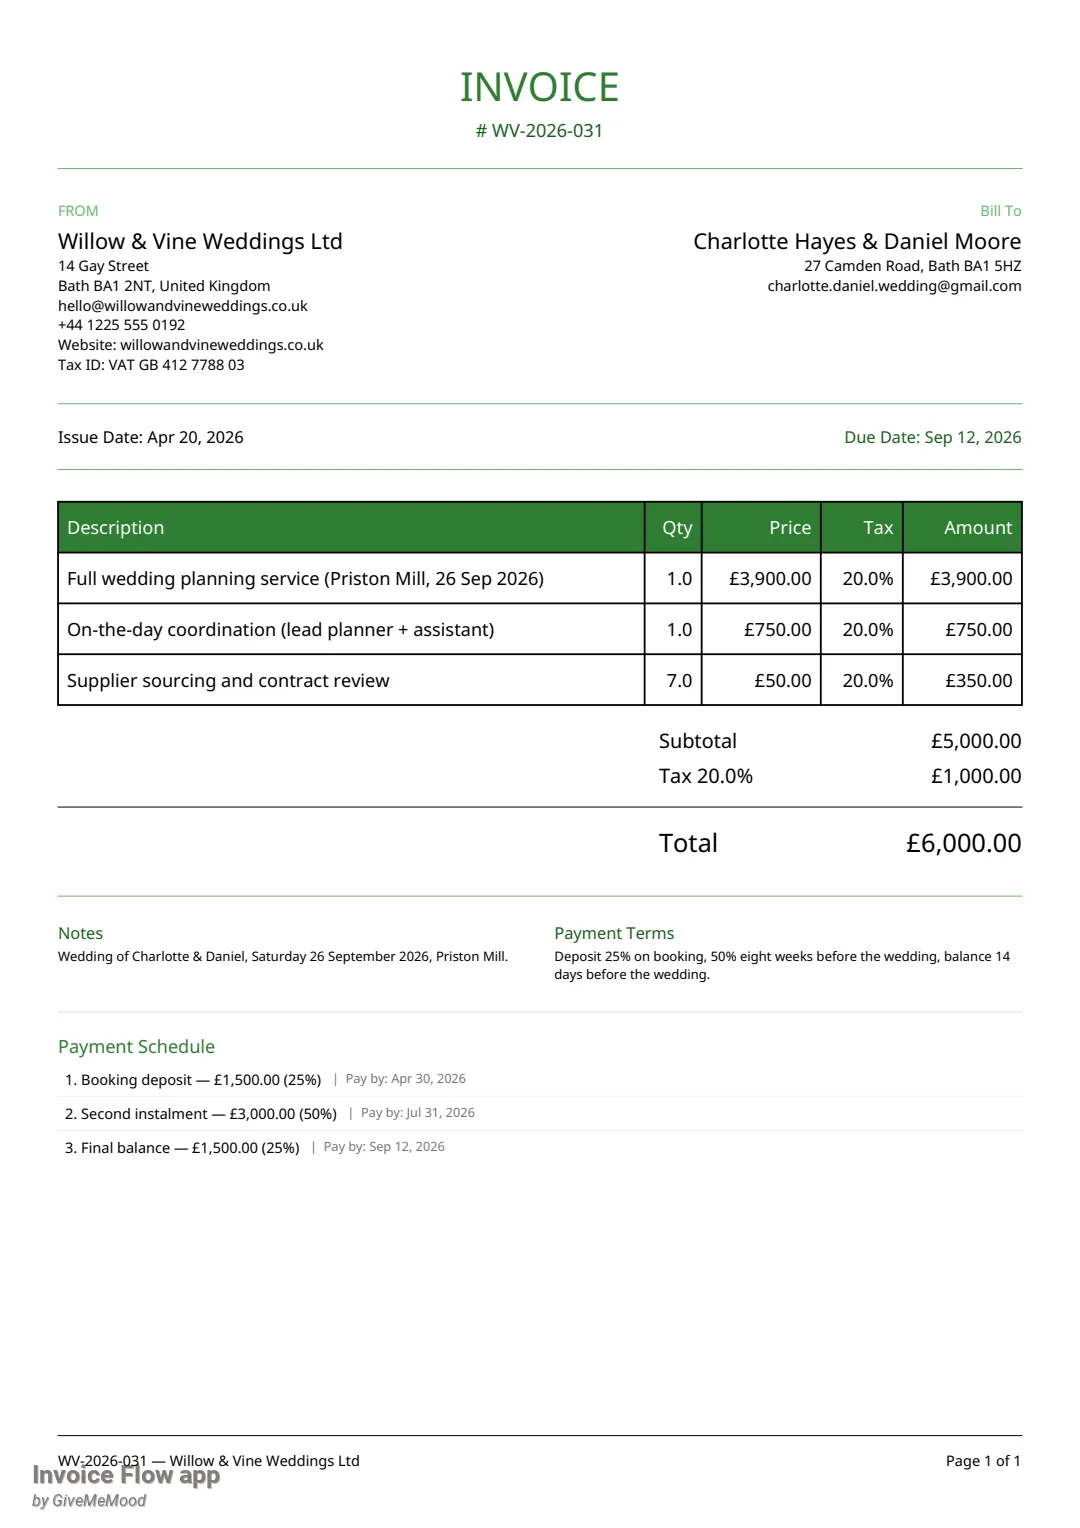
On the generated PDF the schedule appears after the notes and payment terms. Each part is numbered and shows the label, the resolved amount (percentages are converted to money using the invoice total) with the percentage in brackets, and the From and Pay by dates. If a part carries a QR code or payment buttons they print beside it. When two or more QR codes end up on the page, a small “(i)” note warns the reader that the invoice contains multiple codes and to scan the right one.
Rules and details
- Which invoices have a Payments card. Invoices with status Sent, Overdue or Paid. Drafts, cancelled invoices and every kind of estimate hide the card. Mark a draft as Sent first if you need to log a deposit that arrived before you formally issued the invoice.
- Amount validation. The amount must be a number greater than zero; the Save Payment button silently does nothing otherwise. Over-payment is accepted: the remaining figure clamps at zero and the bar at 100%, and the invoice is marked Paid. Negative amounts cannot be entered, so a refund has to be handled by deleting a payment or issuing a separate document.
- Payment date. Defaults to today and cannot be set in the future; the picker goes back to 2020.
- Currency. Every payment is saved in the invoice currency; the dialog shows that currency as a prefix and there is no way to pick another one in the form. Only payments whose currency matches the invoice are summed into the paid total.
- Auto-paid threshold. The invoice becomes Paid when the remaining amount is one cent or less. When money is still outstanding but you have an early-payment discount policy and the client paid exactly the discounted total, the app treats the invoice as settled and grants the discount instead of leaving it partially paid.
- What automatic Paid does not do. Marking Paid through the ledger does not cancel scheduled reminders for that invoice, does not run the late-fee “forgive on payment” check, and does not fire the payment-received automation rule; those only run when you use Mark as paid in the menu. If you rely on reminders or automations, prefer the menu for the final payment, or follow the ledger save with a look at the reminder settings.
- What manual Mark as paid does not do. It changes only the status. The paid and remaining amounts are left as they were, so an invoice with £1,500 outstanding on the card can still read Paid at the top. The Record button is hidden on Paid invoices, which means you cannot add the missing payment afterwards without first choosing Mark as unpaid. The same applies to bulk mark-paid from the Documents list.
- Mark as unpaid sets the status back to Sent and touches nothing else. Reminders may resume.
- Overdue is not stored anywhere. A Sent invoice whose due date has passed is displayed as Overdue; a partially paid one gets the same red badge, and the progress bar is the only indication that part of it has been received. There is no separate “Partially paid” badge.
- Dashboard totals. The Outstanding and Overdue tiles on the dashboard add up the full total of every Sent invoice, not the remaining amount. A £6,000 invoice with £4,500 already received still contributes £6,000 to Outstanding until it is marked Paid.
- Client screen. The client detail screen lists each invoice with its total and status badge but does not show a running balance across invoices; open each invoice for its remaining amount.
- Schedule is informational. Parts in a Split Payment schedule do not create payment rows and do not track which instalment has been received. The ledger on the detail screen is the only record of money in. Keep the labels consistent between the two (for example type “Booking deposit (25%)” in the payment’s Notes) so they read together.
- Schedule and templates. The Payment Schedule section is printed by all built-in PDF templates. Custom templates built in the template editor do not print payment options at all.
- New and duplicated invoices. A freshly created invoice starts with the remaining amount equal to its total and nothing paid. Duplicating an invoice copies the schedule but never the payments.
- Pro. Recording, deleting and status changes are available on the free plan. Adding a manual late fee from the same menu is a Pro action.
Tips
Related guides
- Invoice statuses, list and history - what Sent, Overdue and Paid mean and how the Documents filters work.
- Late fees - what happens to an accrued fee when the invoice is finally paid.
- Invoice editor - the full walk-through of the editor where the Payment Options card lives.