 EN
EN  العربية
  Български
  Čeština
  Dansk
Dansk  Deutsch
  Ελληνικά
  Español
  Suomi
Suomi  Français
  עברית
עברית  हिन्दी
  Bahasa Indonesia
  Italiano
  日本語
日本語  한국어
한국어  Bahasa Melayu
  Nederlands
  Norsk
Norsk  Polski
  Português
  Română
  Русский
  Svenska
  Kiswahili
  ไทย
ไทย  Türkçe
  Українська
  Tiếng Việt
  中文
中文 User guide
Recurring invoices and billing schedules
Set up weekly, monthly, quarterly or yearly schedules so Invoice Flow drafts the same invoice for you on every cycle, then review, pause or end them.
If you bill the same client the same amount at regular intervals, typing that invoice out by hand every month is wasted effort and a good way to forget one. A recurring schedule in Invoice Flow stores the client, the line items and the rhythm once; the app then creates a fresh draft invoice each time a cycle comes round, numbered in your normal sequence and dated on the day it was supposed to fire. You still decide when to send it.
The walkthrough below uses Ironline Fitness Studio in Austin, Texas. The studio bills the Hollis family for three memberships every month, invoices the Riverbend Runners Club monthly for a group training block, holds a quarterly corporate wellness contract with Cedar Point Logistics that ends in March 2027, and has a fortnightly studio-rental arrangement with Northgate Physio that is paused for the summer.
What you see on the screen
Recurring schedules live under the Tools tab: open Tools, and in the Productivity section tap the teal Recurring card. The screen that opens is titled Recurring Invoices.
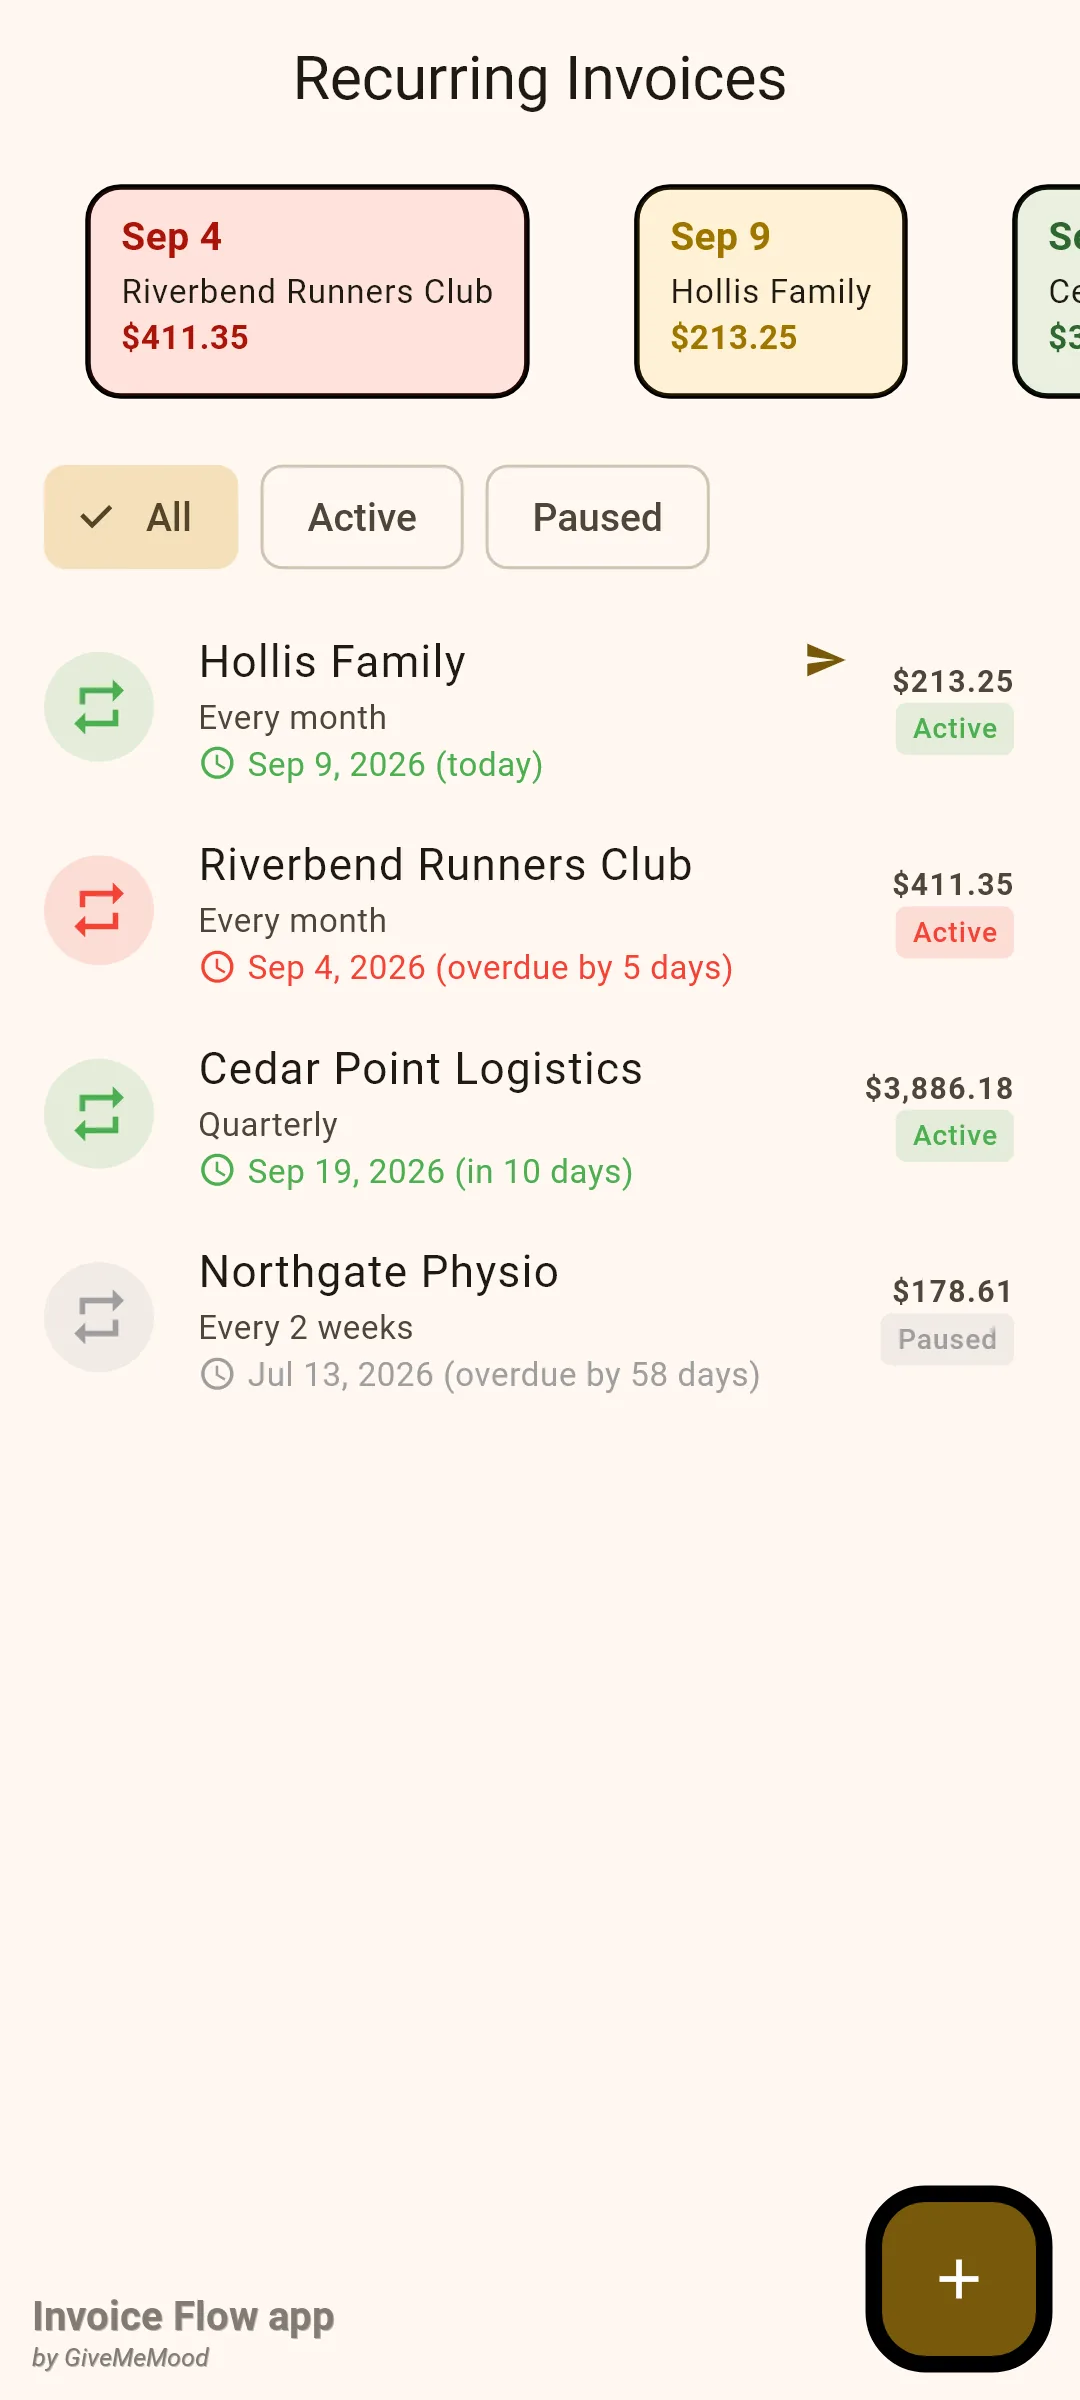
From top to bottom:
- Upcoming strip. As long as at least one schedule is active, a horizontal row of up to four small cards shows the soonest next-run dates, each with the client name and the amount that cycle will produce. The tint tells you how urgent it is: red when the date has already passed, amber when it is within the next three days, green otherwise. Riverbend Runners Club is red because its 4 September date slipped by; the Hollis family card is amber because it is due today.
- Filter chips. All, Active and Paused narrow the list. The strip above is not affected by the chip you pick.
- Schedule rows. Each row shows the client name, the frequency in words (Every month, Every 2 weeks, Quarterly, Every 3 months, and so on), the next run date with a countdown in brackets (today, tomorrow, in 10 days or overdue by 5 days), the total per cycle including tax, and an Active or Paused badge. The round repeat icon on the left is green for an active schedule, red for an active schedule whose next date is already in the past, and grey for a paused one. A small paper-plane icon next to the name means Auto-send is switched on for that schedule.
- + button. Opens the New Schedule editor.
Swiping a row from right to left offers to delete it. A long press opens an action sheet with Edit, Pause (or Activate), Trigger Now and Delete.
How to create a schedule
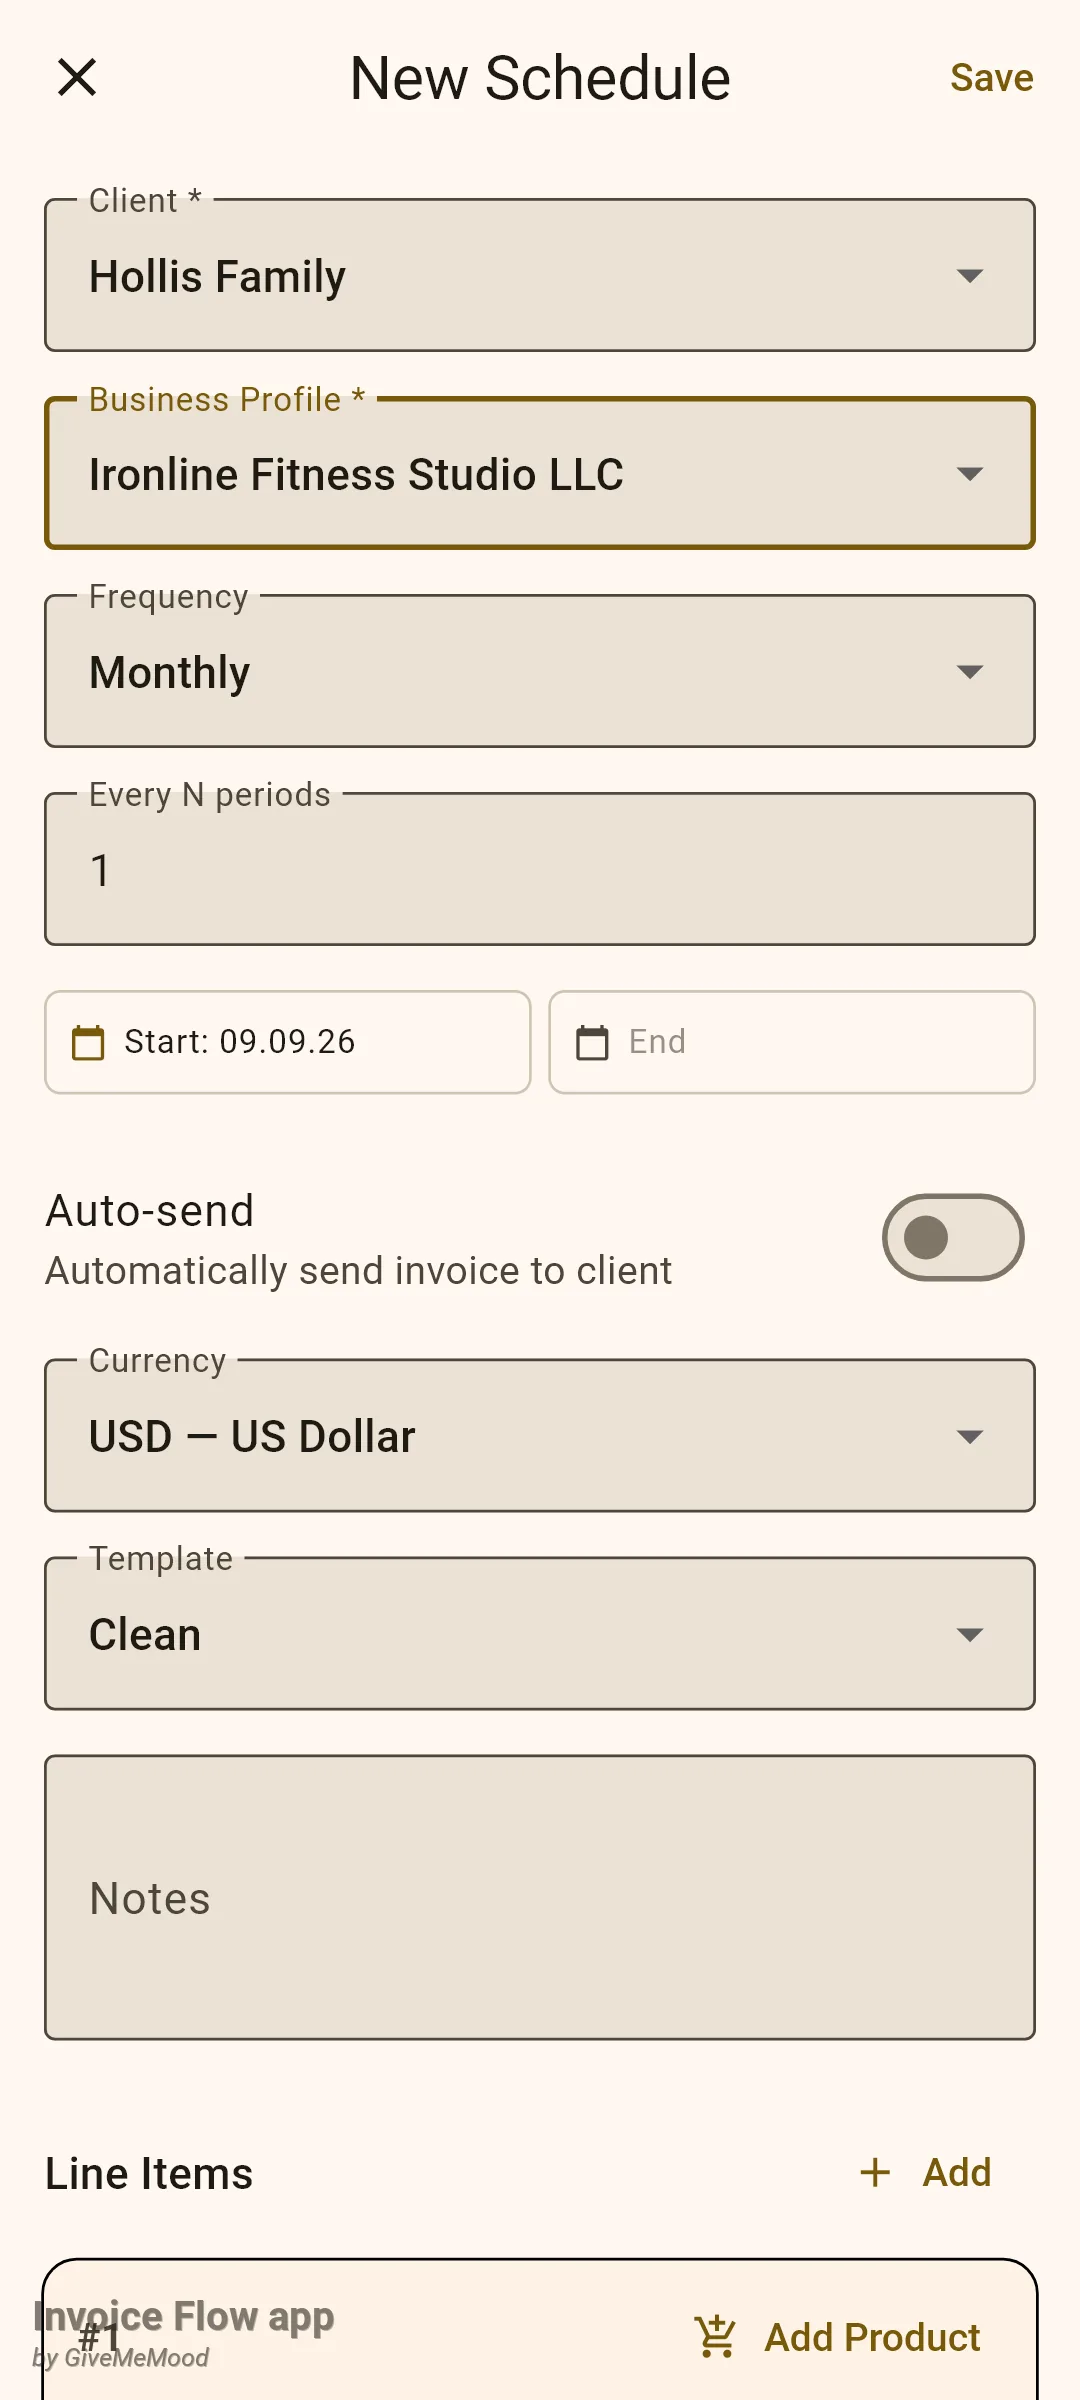
The example is the Hollis family membership: three people, billed on the ninth of every month.
- Open Tools, then Recurring, and tap the + button. Opening the editor needs an active trial or Pro subscription; on a free account you are taken to the upgrade screen instead.
- In Client * pick the customer. The list only contains clients you have already saved, so add the client first if they are new.
- In Business Profile * pick the profile that will issue the invoices. Choosing a profile also switches Currency to that profile's default currency; you can change it afterwards.
- Set Frequency. The options are Weekly, Biweekly, Monthly (the default), Quarterly and Yearly.
- For weekly, monthly or yearly schedules an extra field Every N periods appears. Leave it at 1 for every week or month, or type 2 for every second week, 6 for twice a year, and so on. Biweekly and quarterly do not show this field and always run every two weeks or every three months.
- Tap the Start chip to choose the first billing date. It defaults to today and becomes the first invoice's issue date.
- Optionally tap End and pick the last date the schedule may run to. Tap the small × on the chip to remove an end date again.
- Leave Auto-send alone for now (see Rules and details), check Currency and pick the PDF Template the generated invoices should use.
- Type anything that should appear in the notes of every generated invoice into Notes, for example the membership plan or a purchase-order reference.
The editor keeps a lookout for unsaved edits: if you tap the × or the back button after changing anything, it asks whether you really want to leave.
How to define the line items that repeat
Everything below Line Items is copied onto each generated invoice exactly as you leave it here. The screenshot shows the Cedar Point Logistics contract opened for editing: 24 employee seats at 135 USD plus one on-site workshop a quarter.
- Scroll down to Line Items. A new schedule starts with one empty item card labelled #1.
- Either type into Description, Qty, Price and Tax % by hand, or tap Add Product on the card to pull an item from your product library. Picking a product fills in its name, price and tax rate and keeps a link to the product; the quantity you already entered is kept.
- Tap Add next to the Line Items heading for each further item. The new card is highlighted briefly and the page scrolls to it.
- Remove an unwanted item with the red minus icon on its card. The icon only appears while the schedule has more than one item.
- Check the grey Total per cycle box at the bottom. It is quantity × price × (1 + tax) summed over all items, which is the figure the list and the upcoming strip will show.
- Tap Save in the top-right corner.
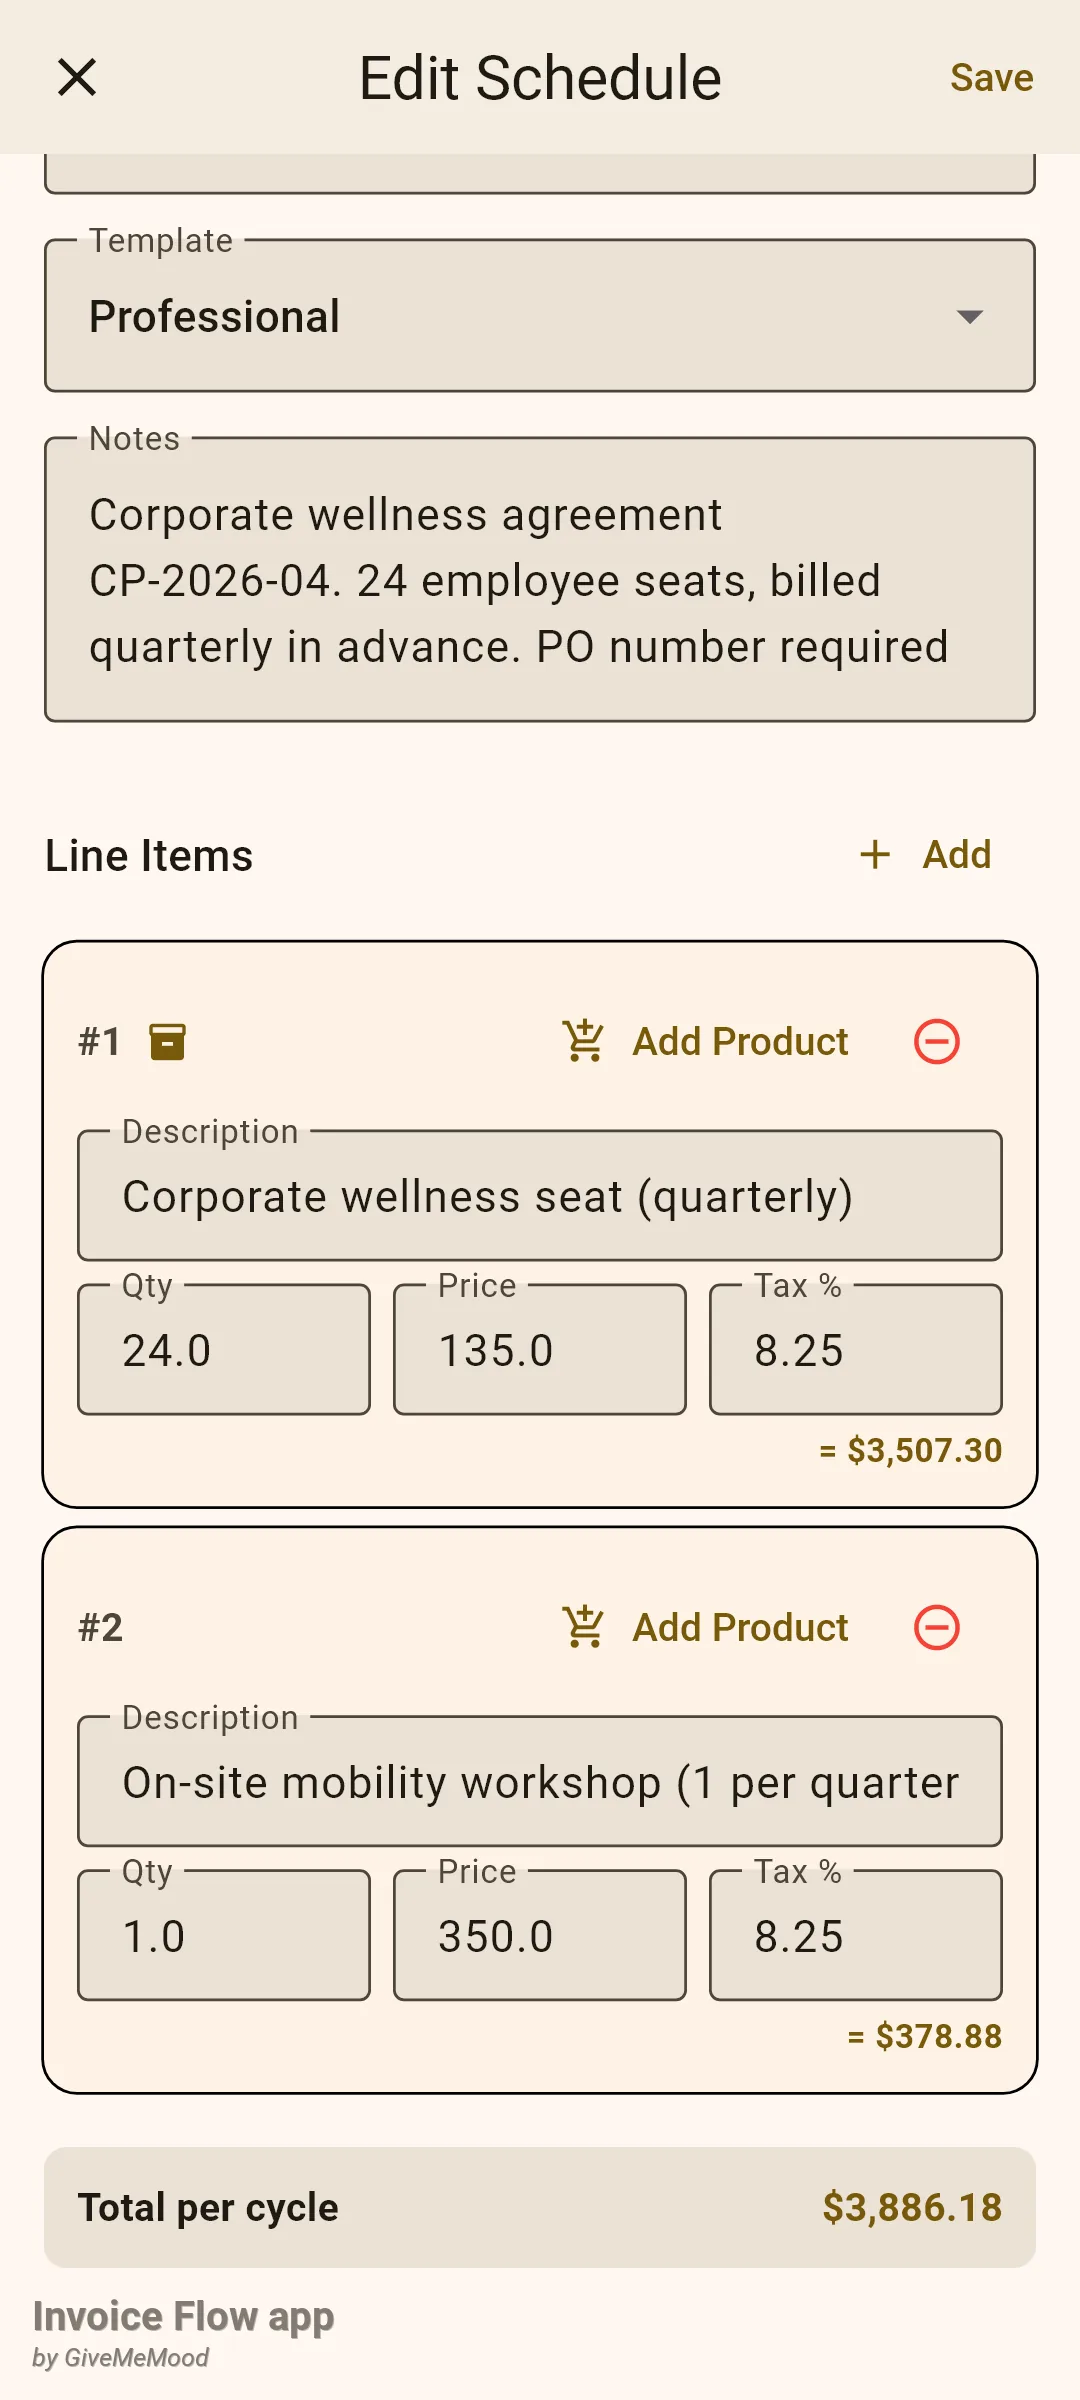
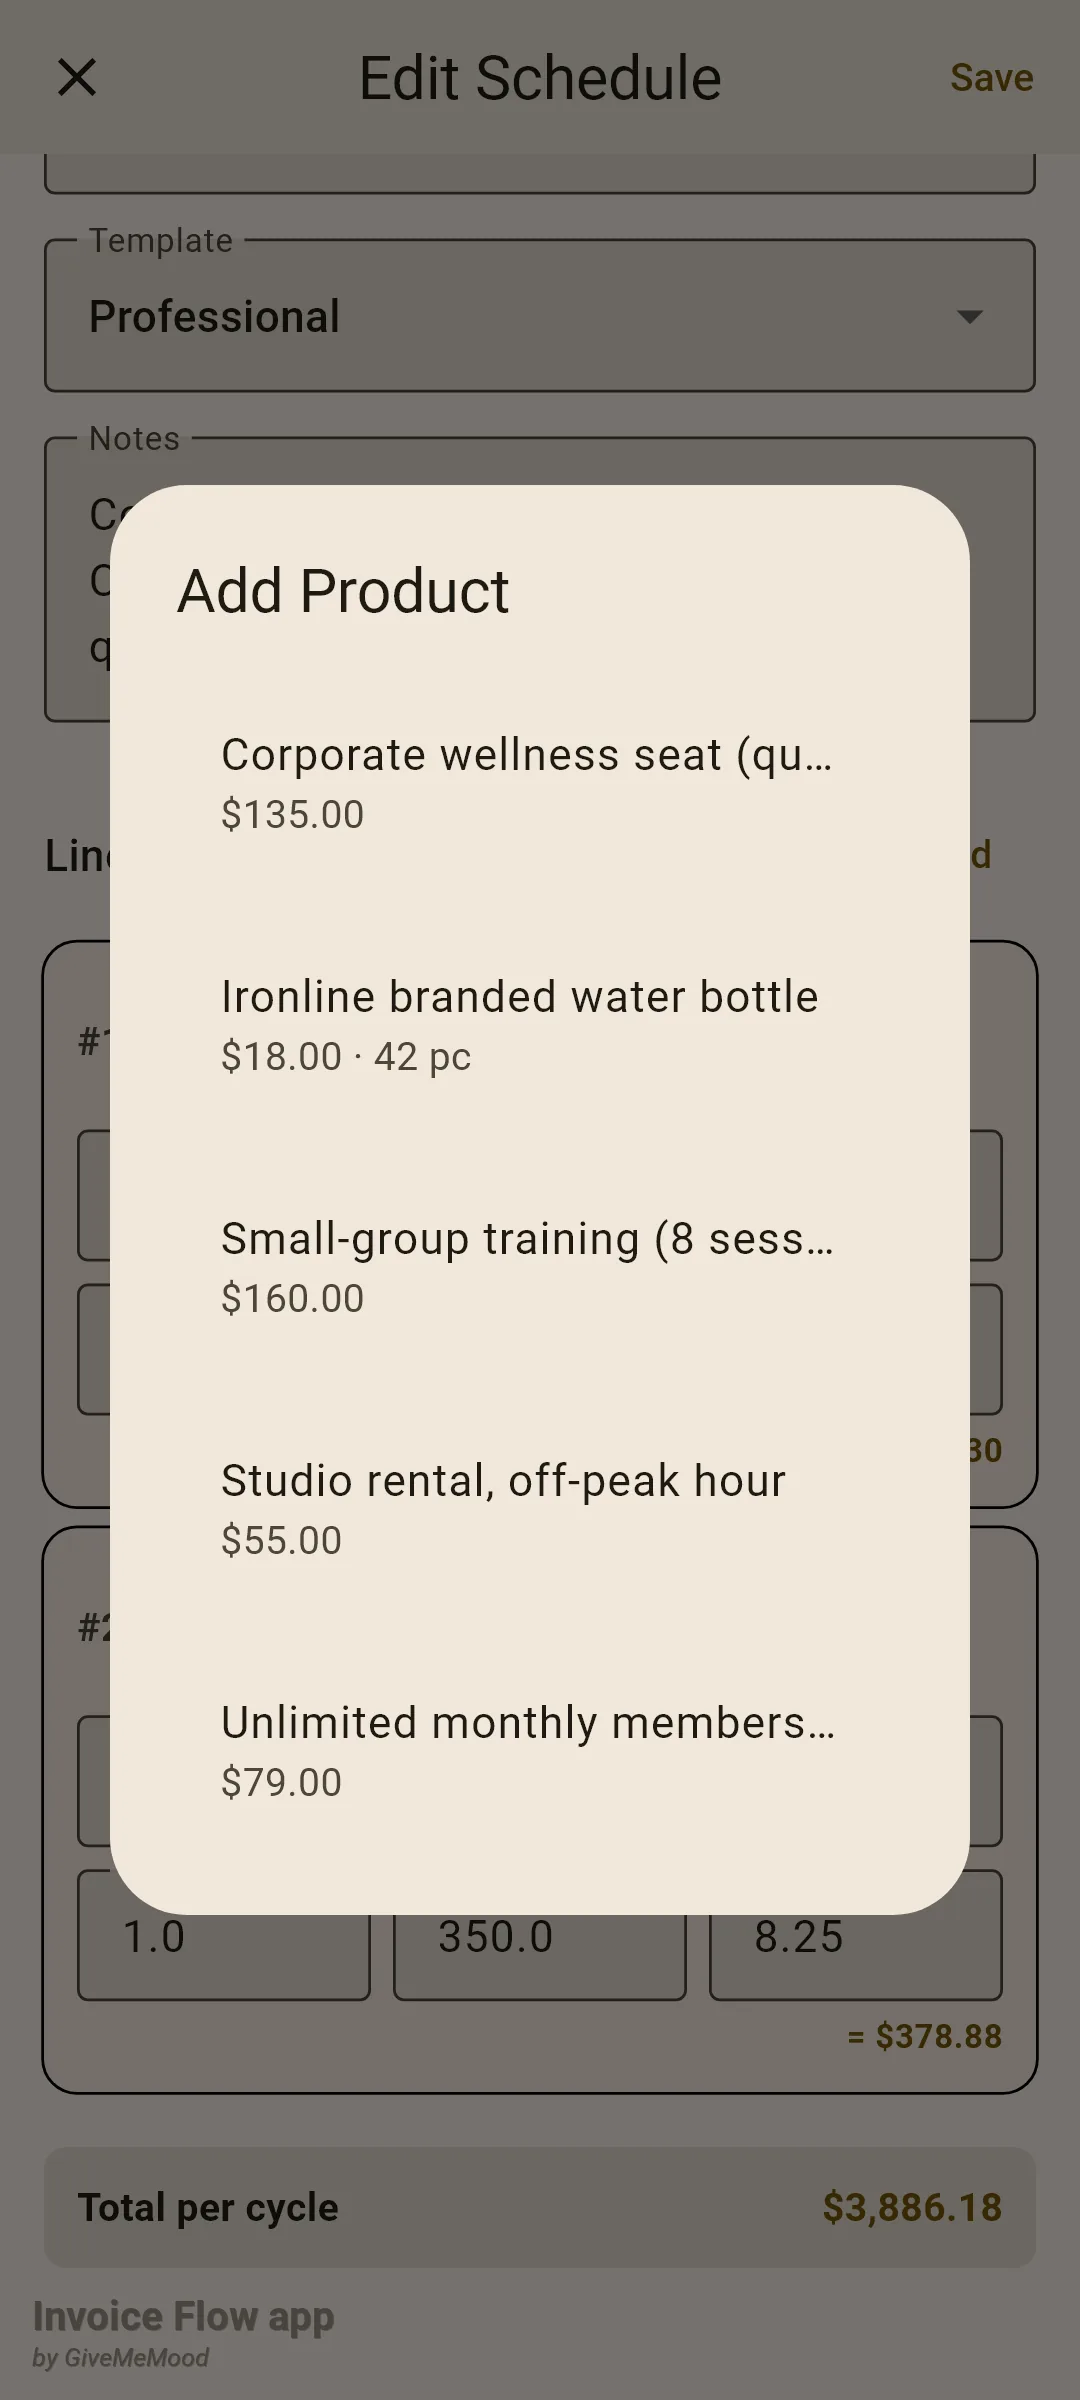
A small box icon beside the item number, as on item #1 above, tells you the line is linked to a product. That link matters if you use inventory automation: when the invoice is generated, the app can deduct stock for linked products according to your automation settings.
Saving is refused in two cases: a missing client or profile (the dropdown shows Select a client or Select a profile), and a schedule where every item has an empty description and a price of zero (a short Add at least one item message appears).
How to pause, resume, skip or delete a schedule
Long-press a row on the Recurring Invoices screen to open its action sheet.
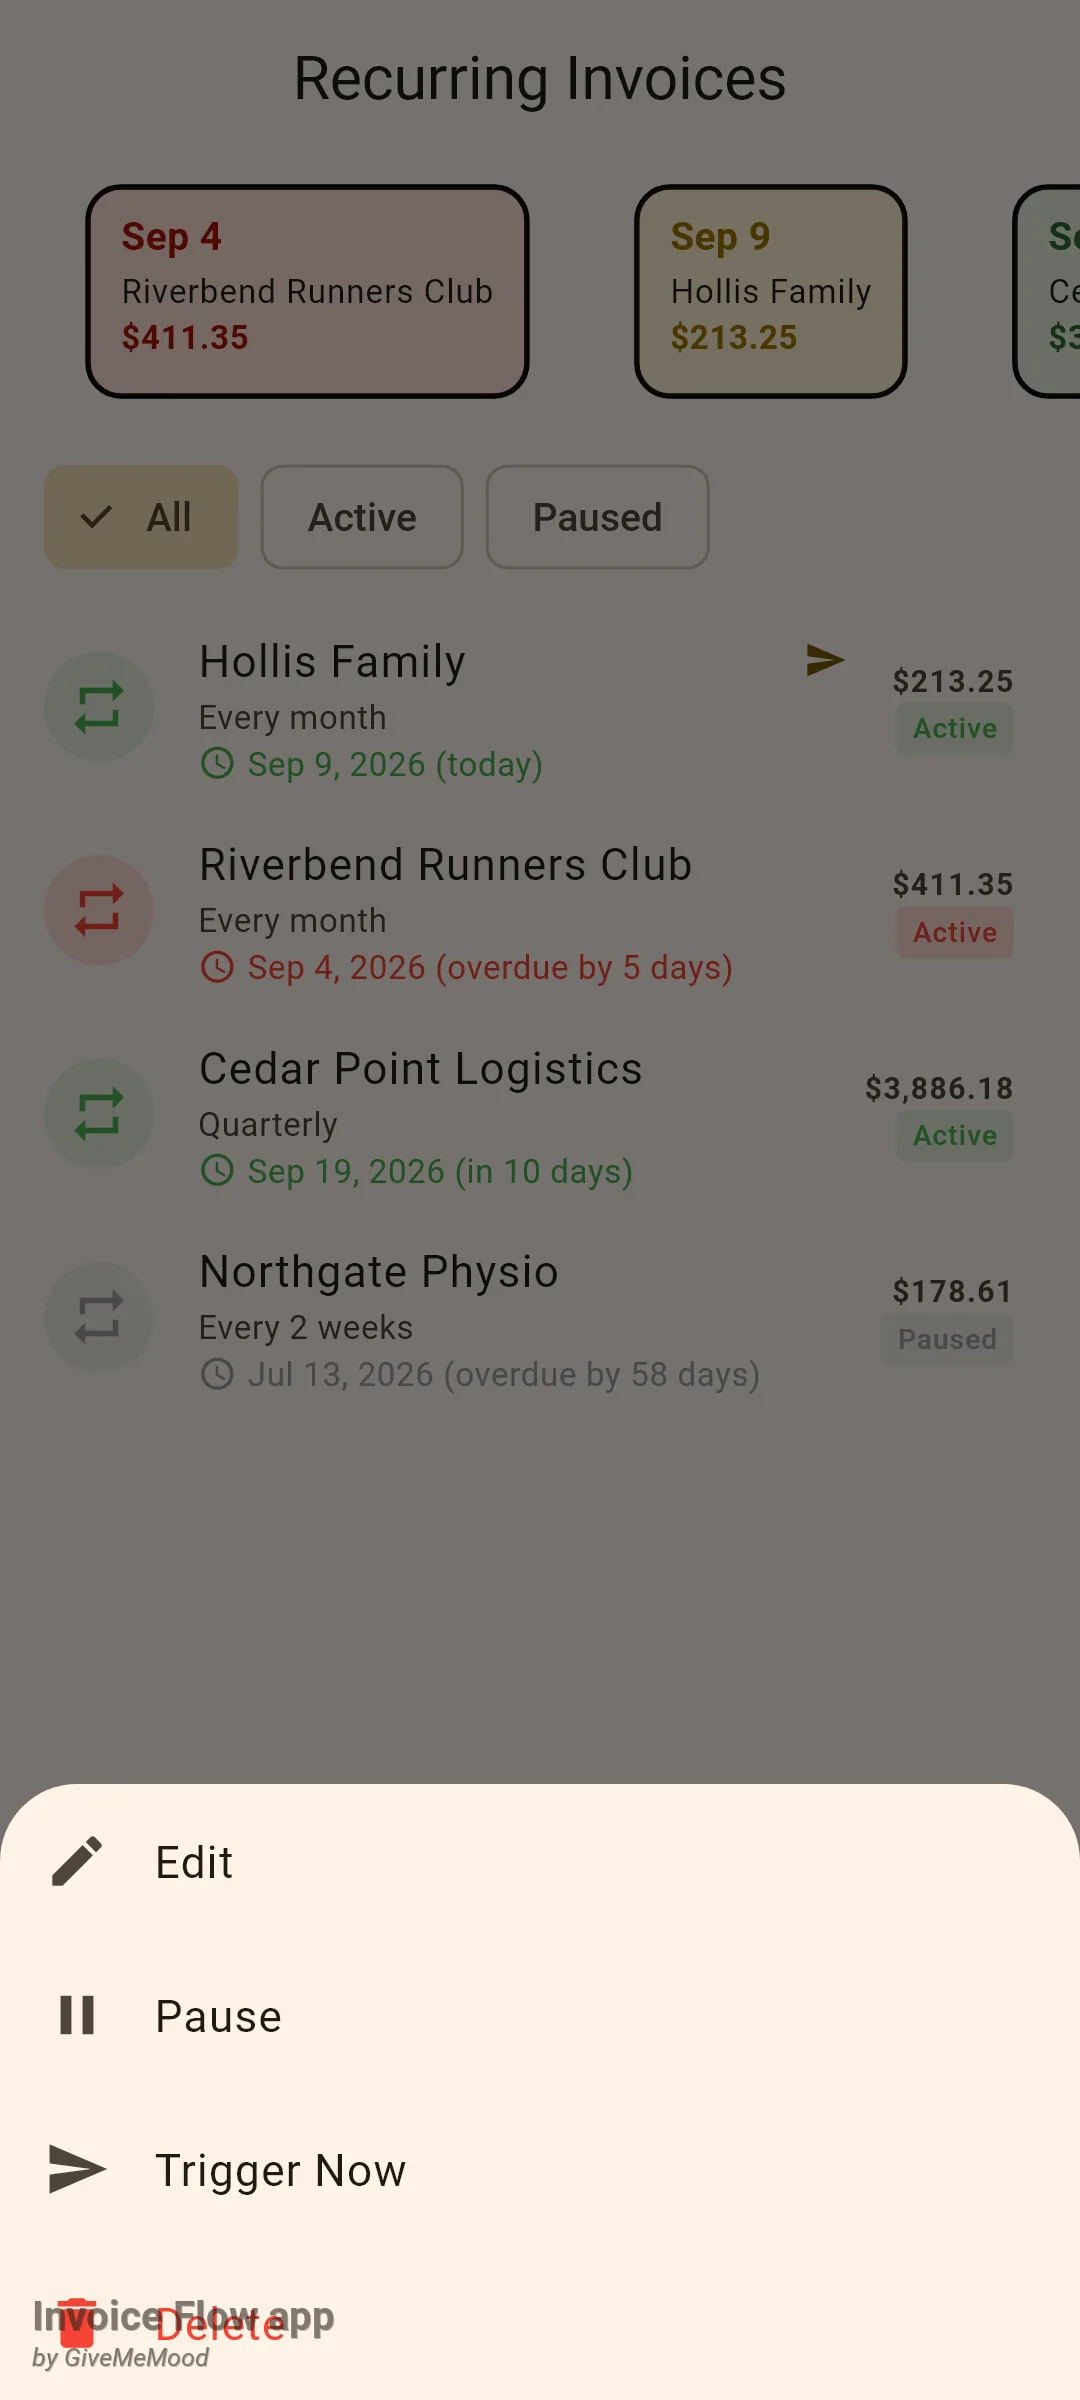
- To stop a schedule temporarily, choose Pause. The badge turns to Paused, the icon goes grey, and the schedule disappears from the upcoming strip. Nothing else about it changes, including its next date.
- To resume, long-press the paused row and choose Activate. If its next date is now in the past, the app will catch up on the next launch: one invoice per missed period. Edit the schedule first if you would rather not bill the paused months.
- To skip the current period without producing an invoice, choose Trigger Now. Despite its name this does not create an invoice; it stamps the schedule as handled today and moves the next date forward by one period. A message such as Invoice triggered, next: Oct 9, 2026 confirms the new date.
- To change the rhythm, dates, items or notes, choose Edit. Editing never moves the next run date and never changes the active or paused state.
- To remove a schedule for good, choose Delete (or swipe the row left) and confirm Delete in the Delete schedule? dialog. Invoices the schedule already produced stay in your documents.
How generated invoices appear and how to find them
The app checks for due schedules every time it is started cold (fully closed, then opened again), not while it sits in the background and not on a plain switch back to it. A schedule is due when it is active and its next date is today or earlier. For every due schedule the app creates one draft invoice per missed period and moves the next date forward, so a phone that stayed in a drawer for two months produces both of the missing monthly invoices on the next launch.
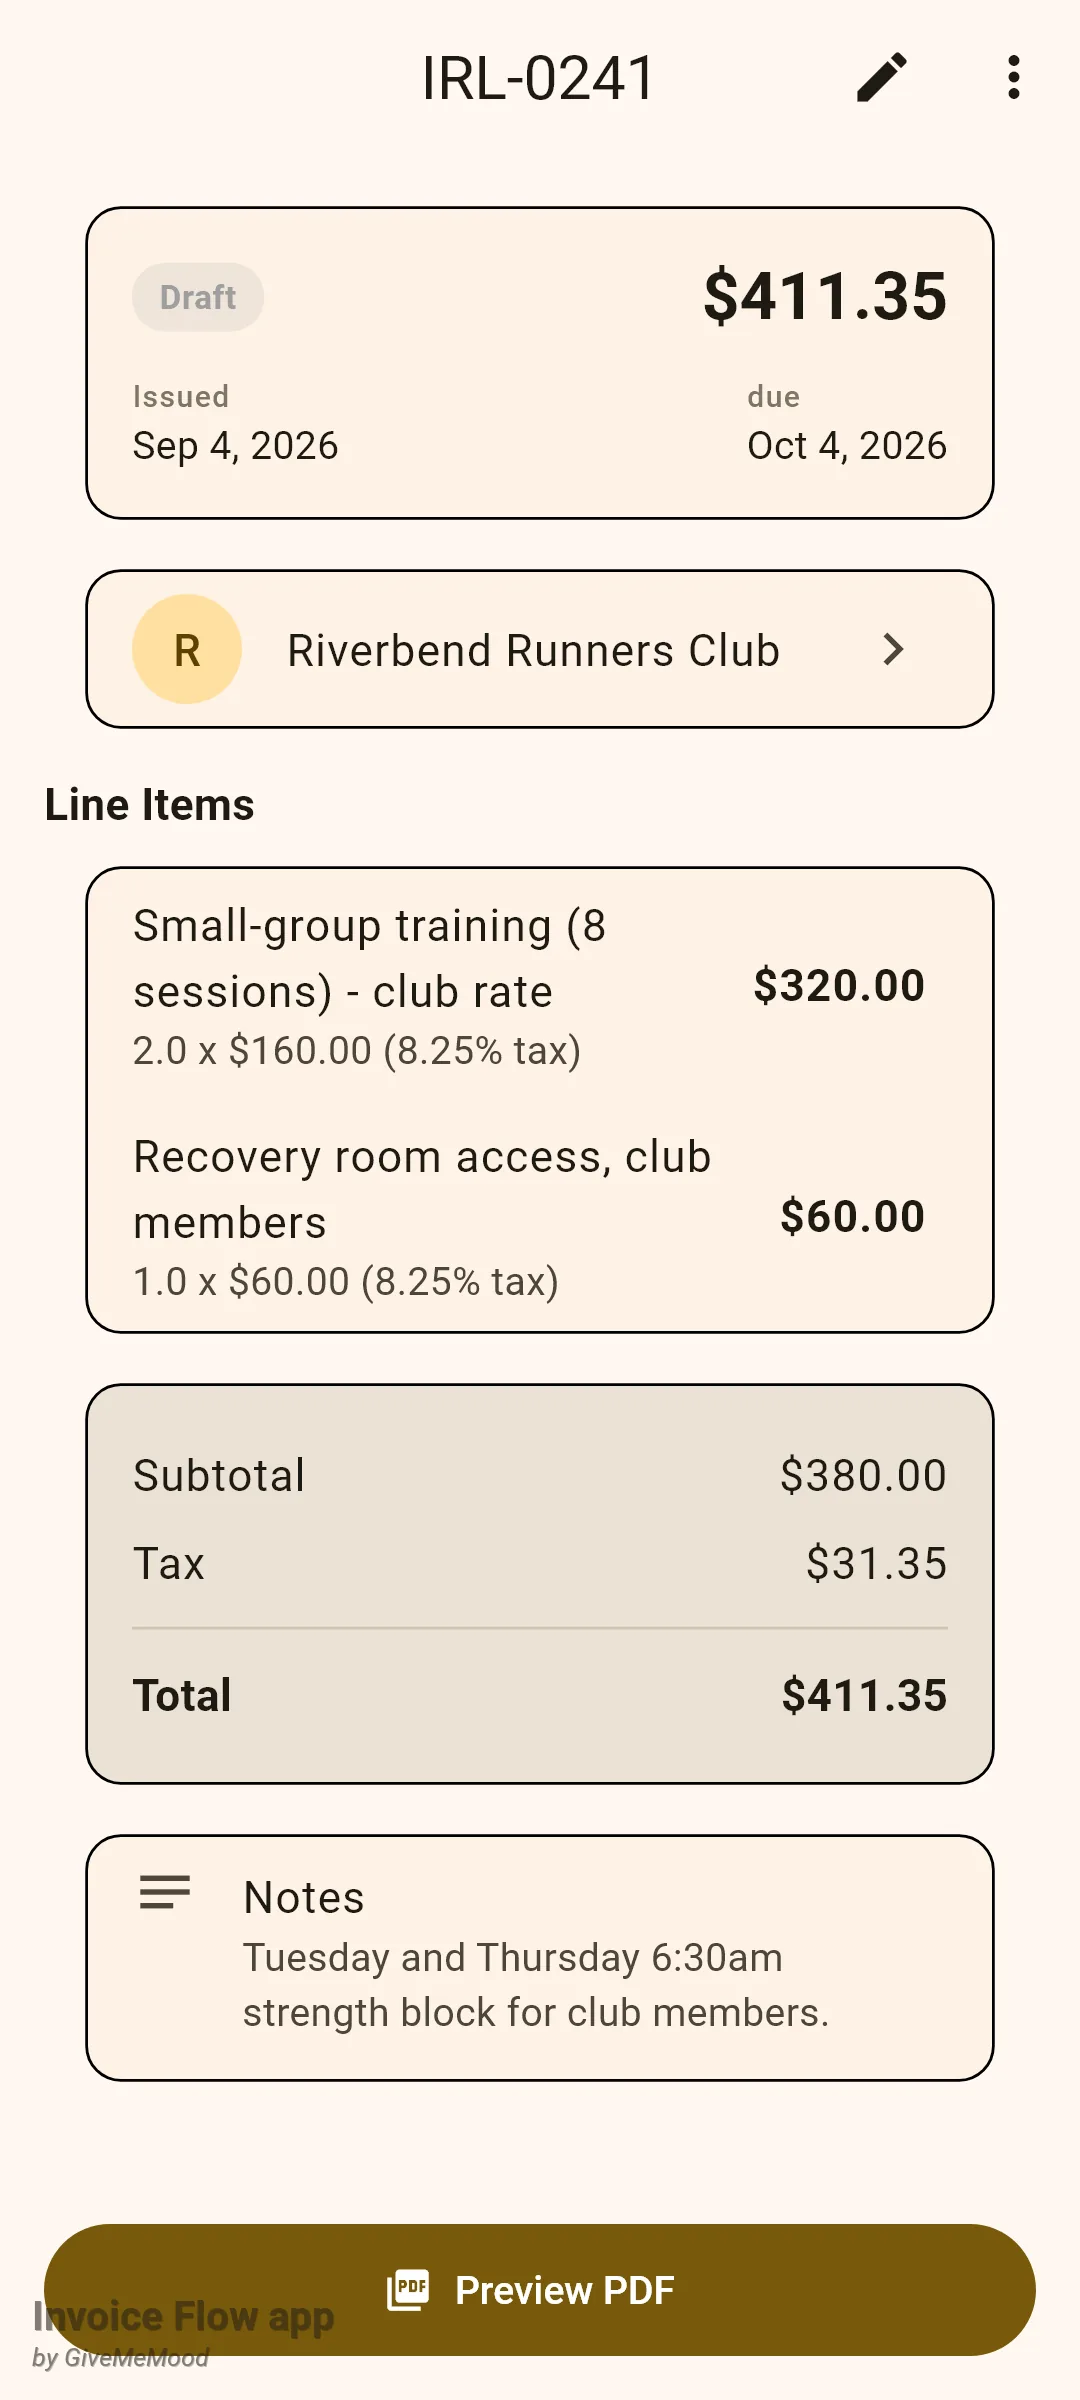
Each generated invoice:
- has status Draft, so nothing goes out until you open it and send it;
- takes the next free number from the issuing profile’s default invoice numbering series (or its simple prefix and counter if no series exists), advancing the counter just like a hand-made invoice;
- is issued on the date the cycle was scheduled for, not the date you happened to open the app, so a catch-up run keeps the right dates on the paperwork;
- is due 30 days after that issue date;
- carries the schedule’s currency, template, notes and line items, with subtotal, tax and total already worked out;
- freezes your profile’s contact details, tax IDs, addresses and payment terms as they were at that moment, so editing the profile later will not rewrite this invoice’s PDF.
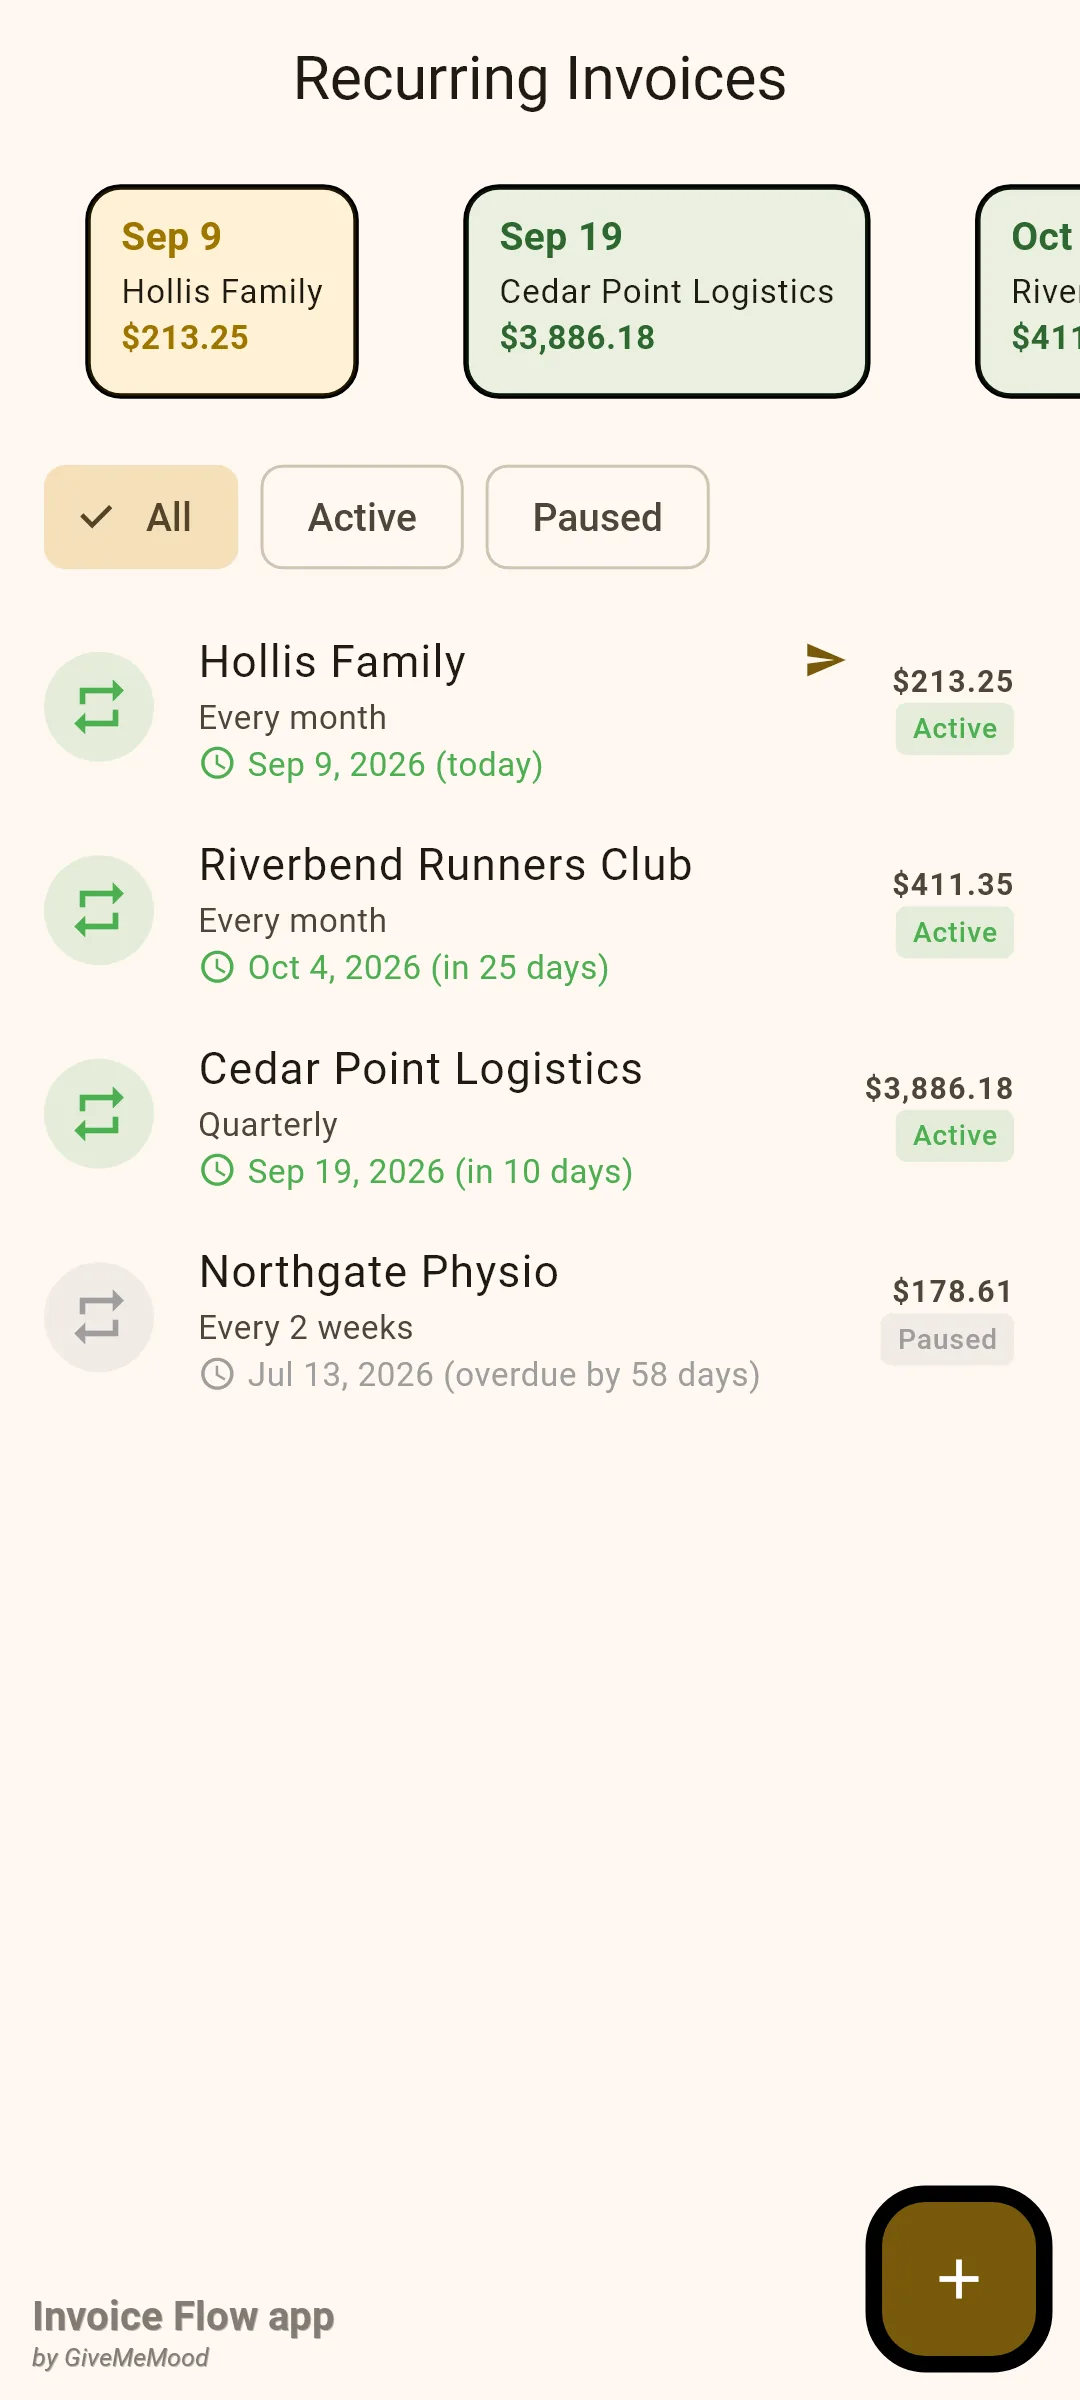
After the sweep the schedule itself has moved on. Compare the list from the start of this guide with the one below: the Runners Club row now says 4 October, 25 days away, and the upcoming strip has re-ordered itself.
To pull out everything a schedule has produced:
- Open the Documents tab with the Invoices segment selected.
- Tap the filter icon (three horizontal lines) in the top bar to open Filter documents.
- Expand Additional filters and switch on From a recurring schedule.
- Tap Apply. Only invoices created by a schedule remain; combine with the Client picker in the same sheet to see one schedule's history, and with the Draft chip to see what still needs sending.
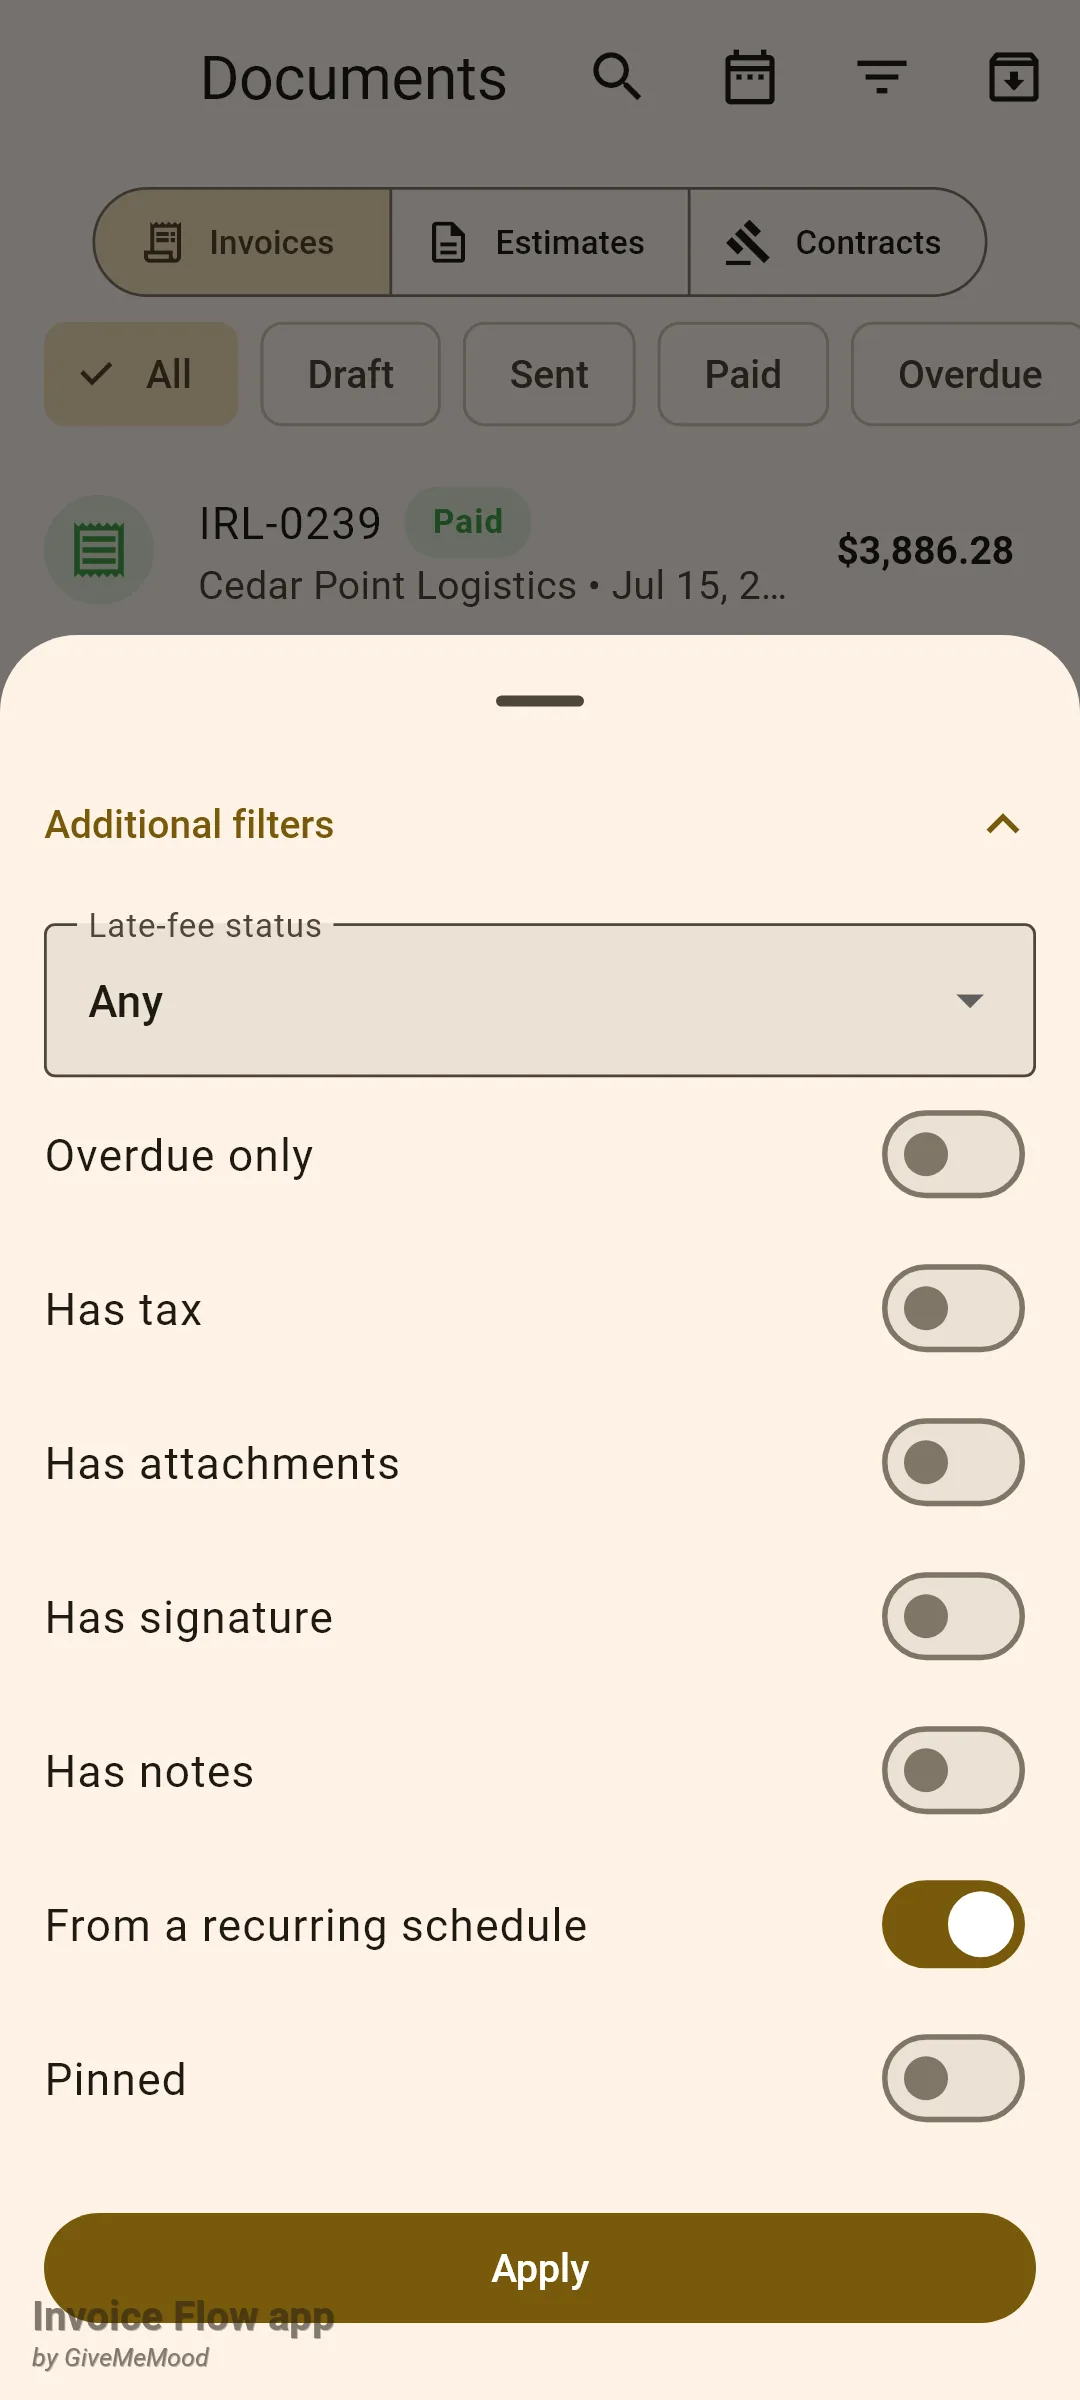
Generated drafts carry no other marker in the list; they can be edited, sent, paid and archived like any other draft.
Rules and details
| Setting | Options and defaults |
|---|---|
| Frequency | Weekly, Biweekly, Monthly (default), Quarterly, Yearly |
| Every N periods | Whole number, 1 by default; shown for Weekly, Monthly and Yearly only |
| Start | Required, defaults to today; becomes the first next-run date |
| End | Optional; the schedule pauses itself once the next date would be on or after it |
| Currency | Any of the popular currencies; preset from the chosen profile |
| Template | Clean (default), Classic, Modern, Bold, Minimal, Executive, Creative, Professional, Elegant, Compact, Contrast |
- Pro gating. Only opening the editor (new or edit) requires a trial or subscription. Viewing the list, pausing, activating, Trigger Now and deleting work on every account.
- Date arithmetic during generation. Weekly adds 7 × N days, biweekly 14 days, monthly N months, quarterly 3 months, yearly 12 × N months. Month-based steps clamp to the last day of the month, so a schedule started on 31 January fires on 28 or 29 February and then on 31 March.
- Trigger Now uses simpler arithmetic. The skip action adds calendar months without that clamping, so a monthly schedule dated 31 January skipped by hand lands on 3 March rather than 28 February. It also ignores the End date. If exact month-end dates matter to you, edit the Start date instead of skipping.
- End date. After generating an invoice the app compares the new next date with the End date; if it is not earlier, the schedule is switched to Paused. Trigger Now does not perform this check.
- Catch-up. Missed periods are generated one after another in a single launch, each dated on its own scheduled day, until the next date is in the future. A schedule that fails (for example because no free invoice number can be found) is skipped for that launch and does not block the others.
- Auto-send is saved with the schedule and shown as a paper-plane icon on the row, but in the current version it does not send anything by itself. Generated invoices are always drafts that you send from the invoice screen. Treat the switch as a reminder of your intention.
- Numbering. The generator uses the same series as your manual invoices and keeps looking until it finds an unused number, so schedules and hand-made invoices never collide. Templates containing a language token drop that token, because schedules do not store an invoice language.
- Editing later. Changes to a schedule apply to invoices generated after the change. Invoices already produced are ordinary invoices and are not touched.
- Deleting a schedule leaves its invoices in place. They keep their link, so they still match the From a recurring schedule filter.
- Analytics. The Analytics screen’s Recurring revenue card normalises all active schedules to a monthly figure. Paused schedules are excluded.
Tips
Related guides
- Invoice statuses, list and history for what happens to a draft once you send it.
- Products and inventory for building the product library that Add Product draws on and for stock automation.
- Late fees if a recurring client keeps paying late.