 EN
EN  العربية
  Български
  Čeština
  Dansk
Dansk  Deutsch
  Ελληνικά
  Español
  Suomi
Suomi  Français
  עברית
עברית  हिन्दी
  Bahasa Indonesia
  Italiano
  日本語
日本語  한국어
한국어  Bahasa Melayu
  Nederlands
  Norsk
Norsk  Polski
  Português
  Română
  Русский
  Svenska
  Kiswahili
  ไทย
ไทย  Türkçe
  Українська
  Tiếng Việt
  中文
中文 User guide
Projects and milestones
Group the estimate and invoices for one job under a project, split the work into milestones with budgets and due dates, and see what is invoiced, paid and still to bill.
A long job rarely fits on one invoice. A bathroom remodel starts with an estimate, then gets billed in stages as the demolition, tiling, fixtures and finishing work are signed off. Without something to hold those documents together, you end up scrolling the Documents list and adding numbers in your head. Projects in Invoice Flow solve this: a project is a folder for one engagement, attached to a client, with its own list of linked estimates and invoices, a checklist of milestones, and a Money tab that adds up what has been estimated, invoiced and paid.
This guide follows Redstone Renovations in Denver, which bills the Hartley master bathroom remodel in four milestones: demolition and rough-in ($3,800), tile and waterproofing ($5,200), fixtures and plumbing finish ($4,100) and paint, glass and punch list ($2,400). The whole job was estimated at $15,500.
Projects are optional. If most of your work is one invoice per visit, you can ignore this feature entirely. Reach for it when a single client engagement will produce several documents over weeks or months.
What you see on the screen
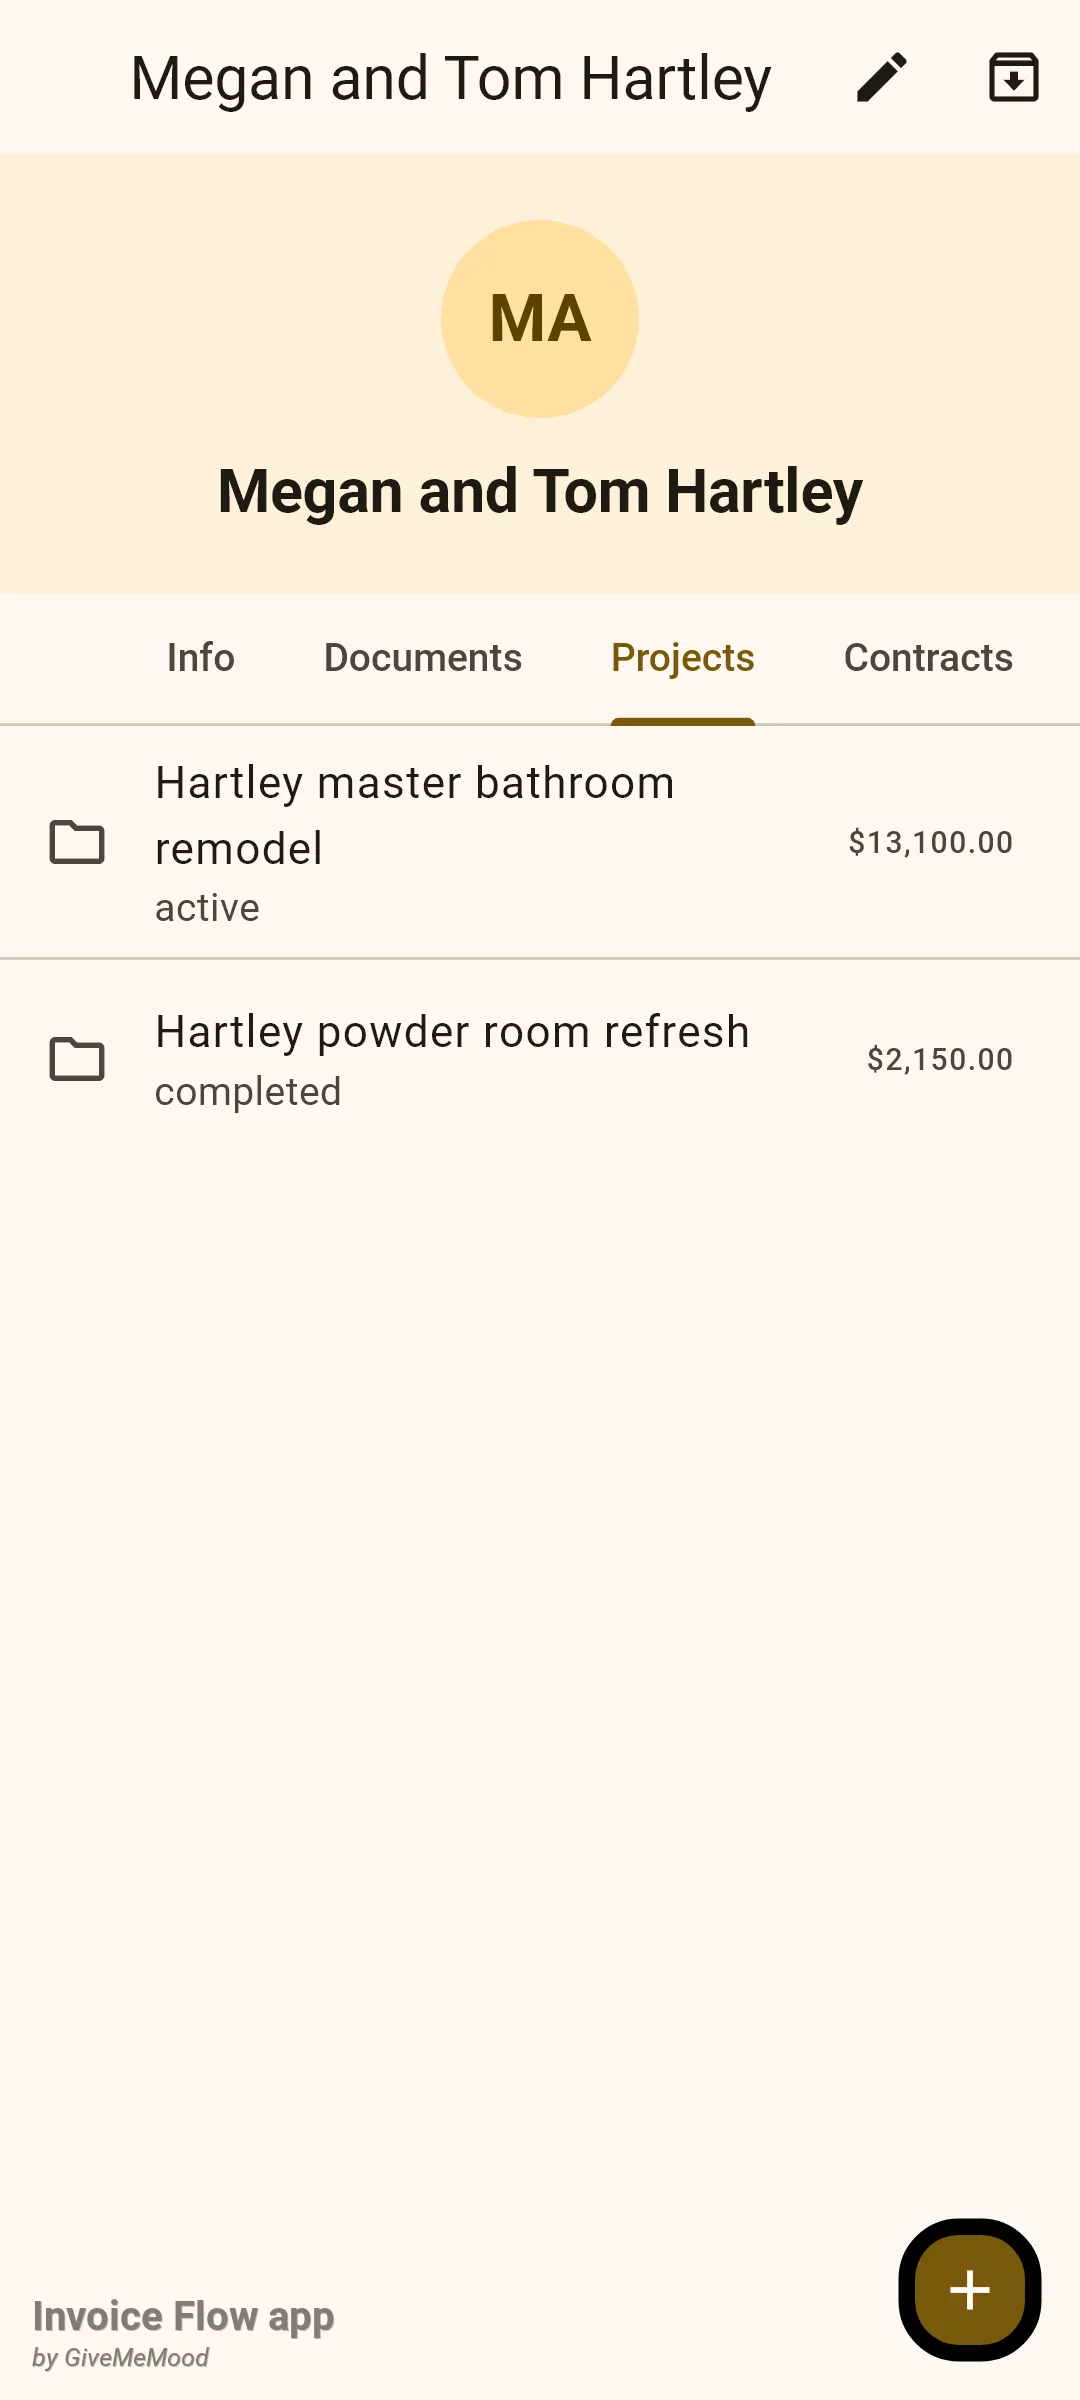
Projects live under the client. Open the Clients tab, tap a client, and you will find five tabs across the top of the client detail screen: Info, Documents, Projects, Contracts and Activity. The Projects tab lists every project attached to that client, with a folder icon, the project name, its status in plain lowercase text and, on the right, the total invoiced so far. A small round + button in the bottom-right corner starts a new project that is already linked to this client. When there are none, the tab simply says No projects for this client.
There is no Projects entry in the bottom navigation, the Tools screen or Settings. The client’s Projects tab and the Projects tile inside the invoice editor are the two places you will meet the feature, so if you cannot find your projects, go through the client.
Tapping a project opens its workspace. The title bar shows the project name with three icons: a pencil (Edit Project), a circular arrow that recalculates the money totals, and a bin (Delete project). Below the title sit four tabs:
| Tab | What it holds |
|---|---|
| Documents | Every estimate and invoice linked to this project, with document type, raw status and total. Tap a row to open the document. |
| Milestones | The stage checklist, each with a status icon, an optional due date and a three-dot menu. An Add milestone button floats at the bottom. |
| Money | Five figures: Estimated, Invoiced, Paid, Remaining and Remaining to invoice. |
| Notes | One large free-text field with a Save button, for gate codes, site quirks and anything else that is not for the client. |
How to create a project
Start from the client so the link is made for you.
- Open the Clients tab and tap the client, here Megan and Tom Hartley.
- Tap the Projects tab, then the round + button in the bottom-right corner.
- In the New Project form, type a Project name. This is the only required field; leaving it empty shows a red Required hint when you try to save.
- Check the Client dropdown. It is already set to the client you came from; you can switch it or pick Not specified for an internal project.
- Leave Status on Active, or choose On hold, Completed or Cancelled.
- Add a short Description of the scope if you like, then tap Save in the top-right corner.
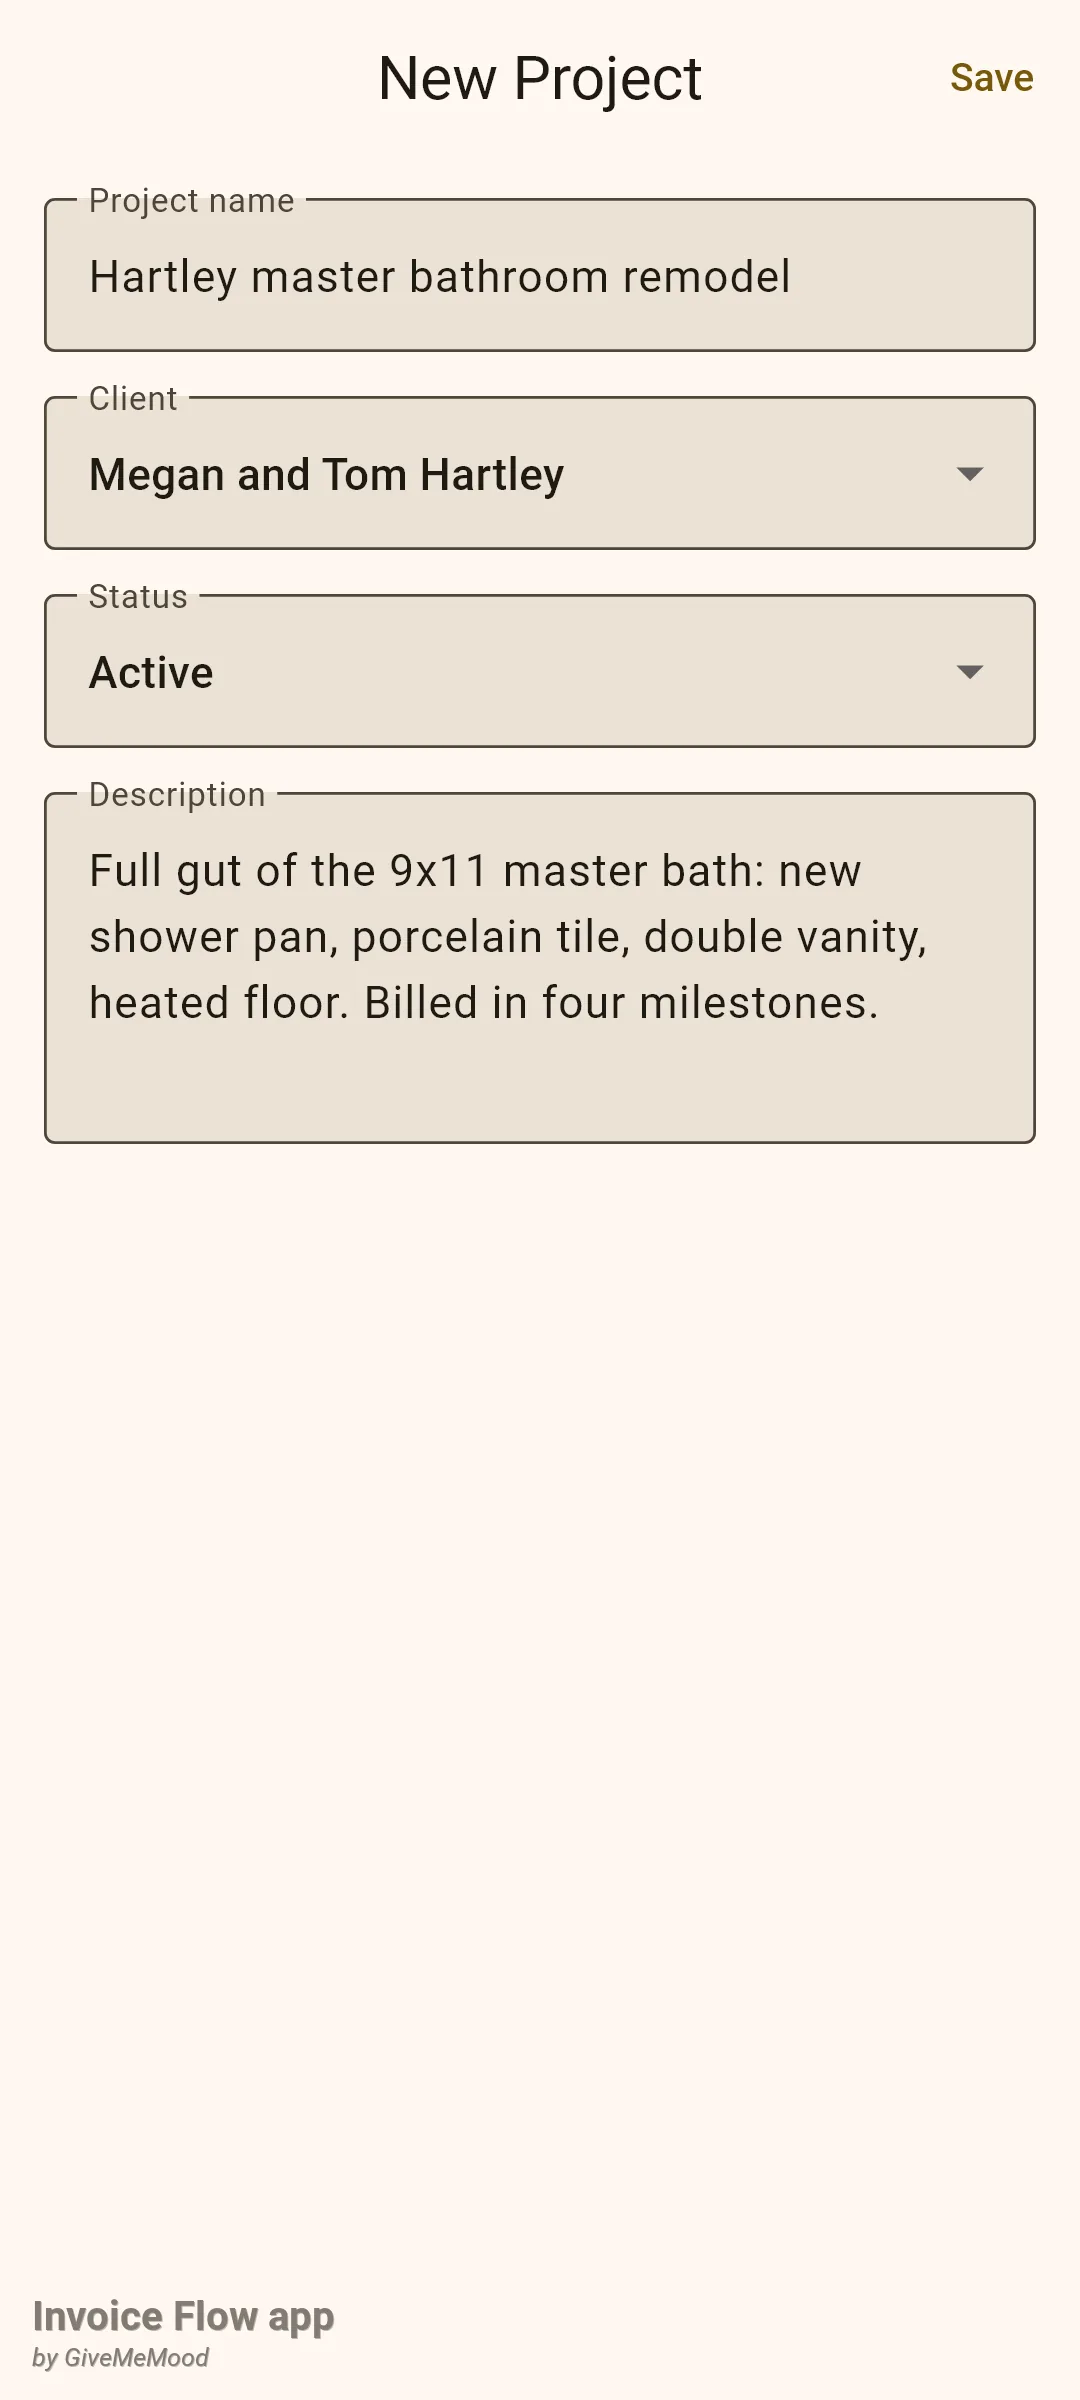
The form deliberately stops there. There are no budget, colour, currency or date fields to fill in. The money side of a project is computed from the documents you link to it, and the schedule side is expressed through milestones, both of which live on the project detail screen you land on after saving.
How to add milestones
Milestones are the stages of the job. Each one carries a name, an estimated amount, a status and an optional due date. They are a planning and progress tool: the app does not generate an invoice from a milestone, and a milestone does not know which invoice paid for it. You still create each stage invoice yourself and link it to the project, as described in the next section.
- From the client's Projects tab, tap the project to open its workspace.
- Tap the Milestones tab, then the Add milestone button at the bottom.
- Type the Milestone name, for example Paint, glass and punch list.
- Enter the stage budget in Estimated as a plain number (2400, no currency symbol).
- Pick a status from the dropdown: Not started, In progress, Done or Skipped. New stages normally stay on Not started.
- Tap the Due Date row, choose a day in the calendar and confirm with OK. The × on the right clears the date again.
- Tap Save. The sheet closes and the milestone appears in the list.
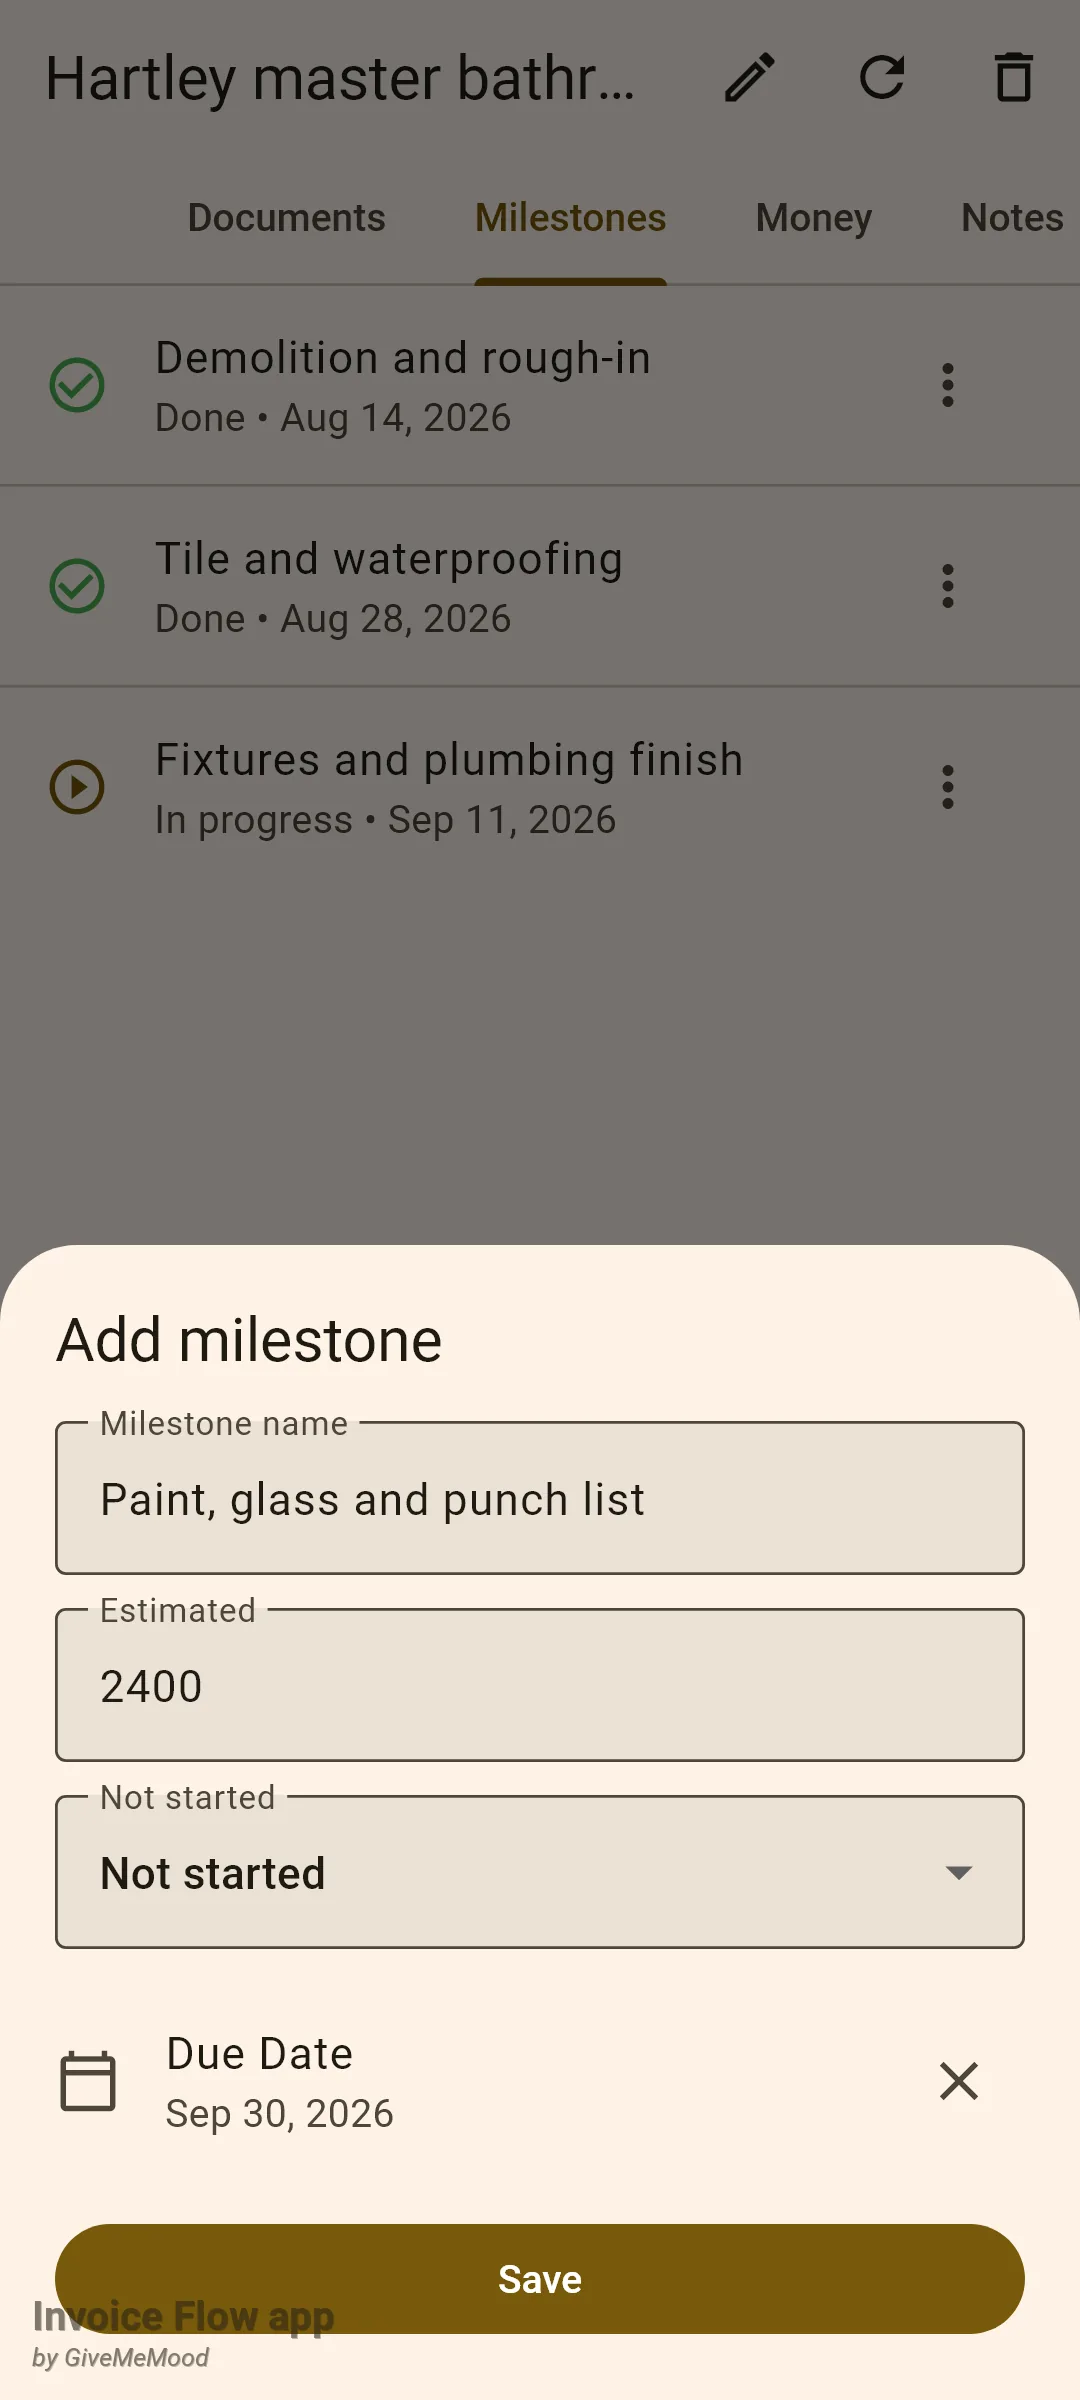
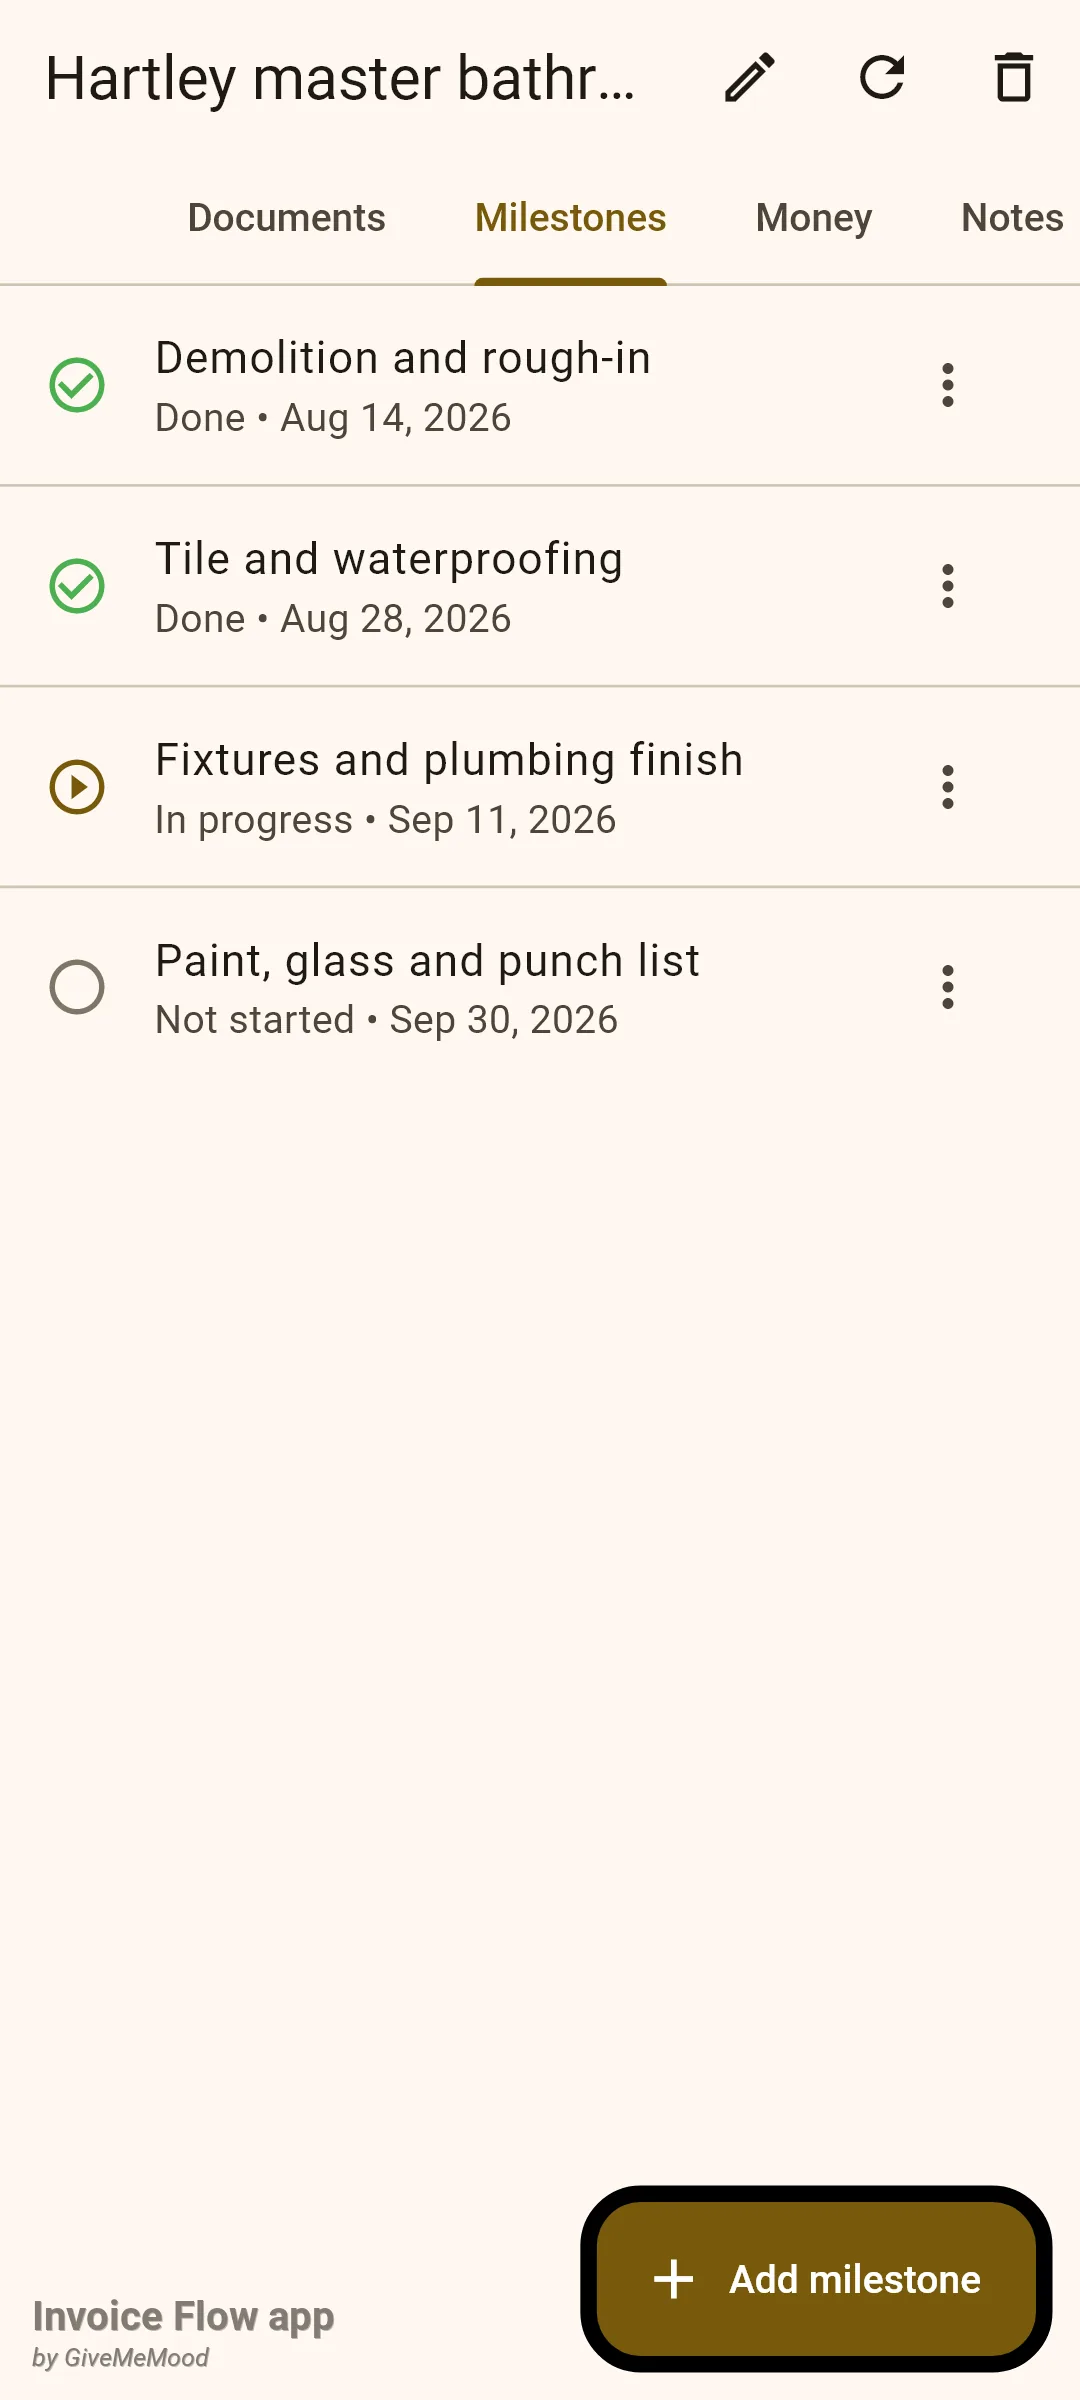
Repeat for every stage. The list is ordered by creation, so add milestones in the order you plan to do the work. As the job progresses, use the three-dot menu on a milestone row to move it along: In progress when you start, Done when the client has signed the stage off, Not started to reset it. The same menu has Edit Project (which, despite its label, opens the milestone editor sheet for that row) and Delete milestone.
How to bill a milestone
Billing a stage means creating a normal invoice and pointing it at the project. The link is made inside the invoice editor through the Projects tile, which sits directly under the Client tile.
- Create the invoice as usual: from the Documents tab, the dashboard, or by duplicating the previous stage invoice. Add a line such as Milestone 4: paint, glass and punch list with the agreed amount.
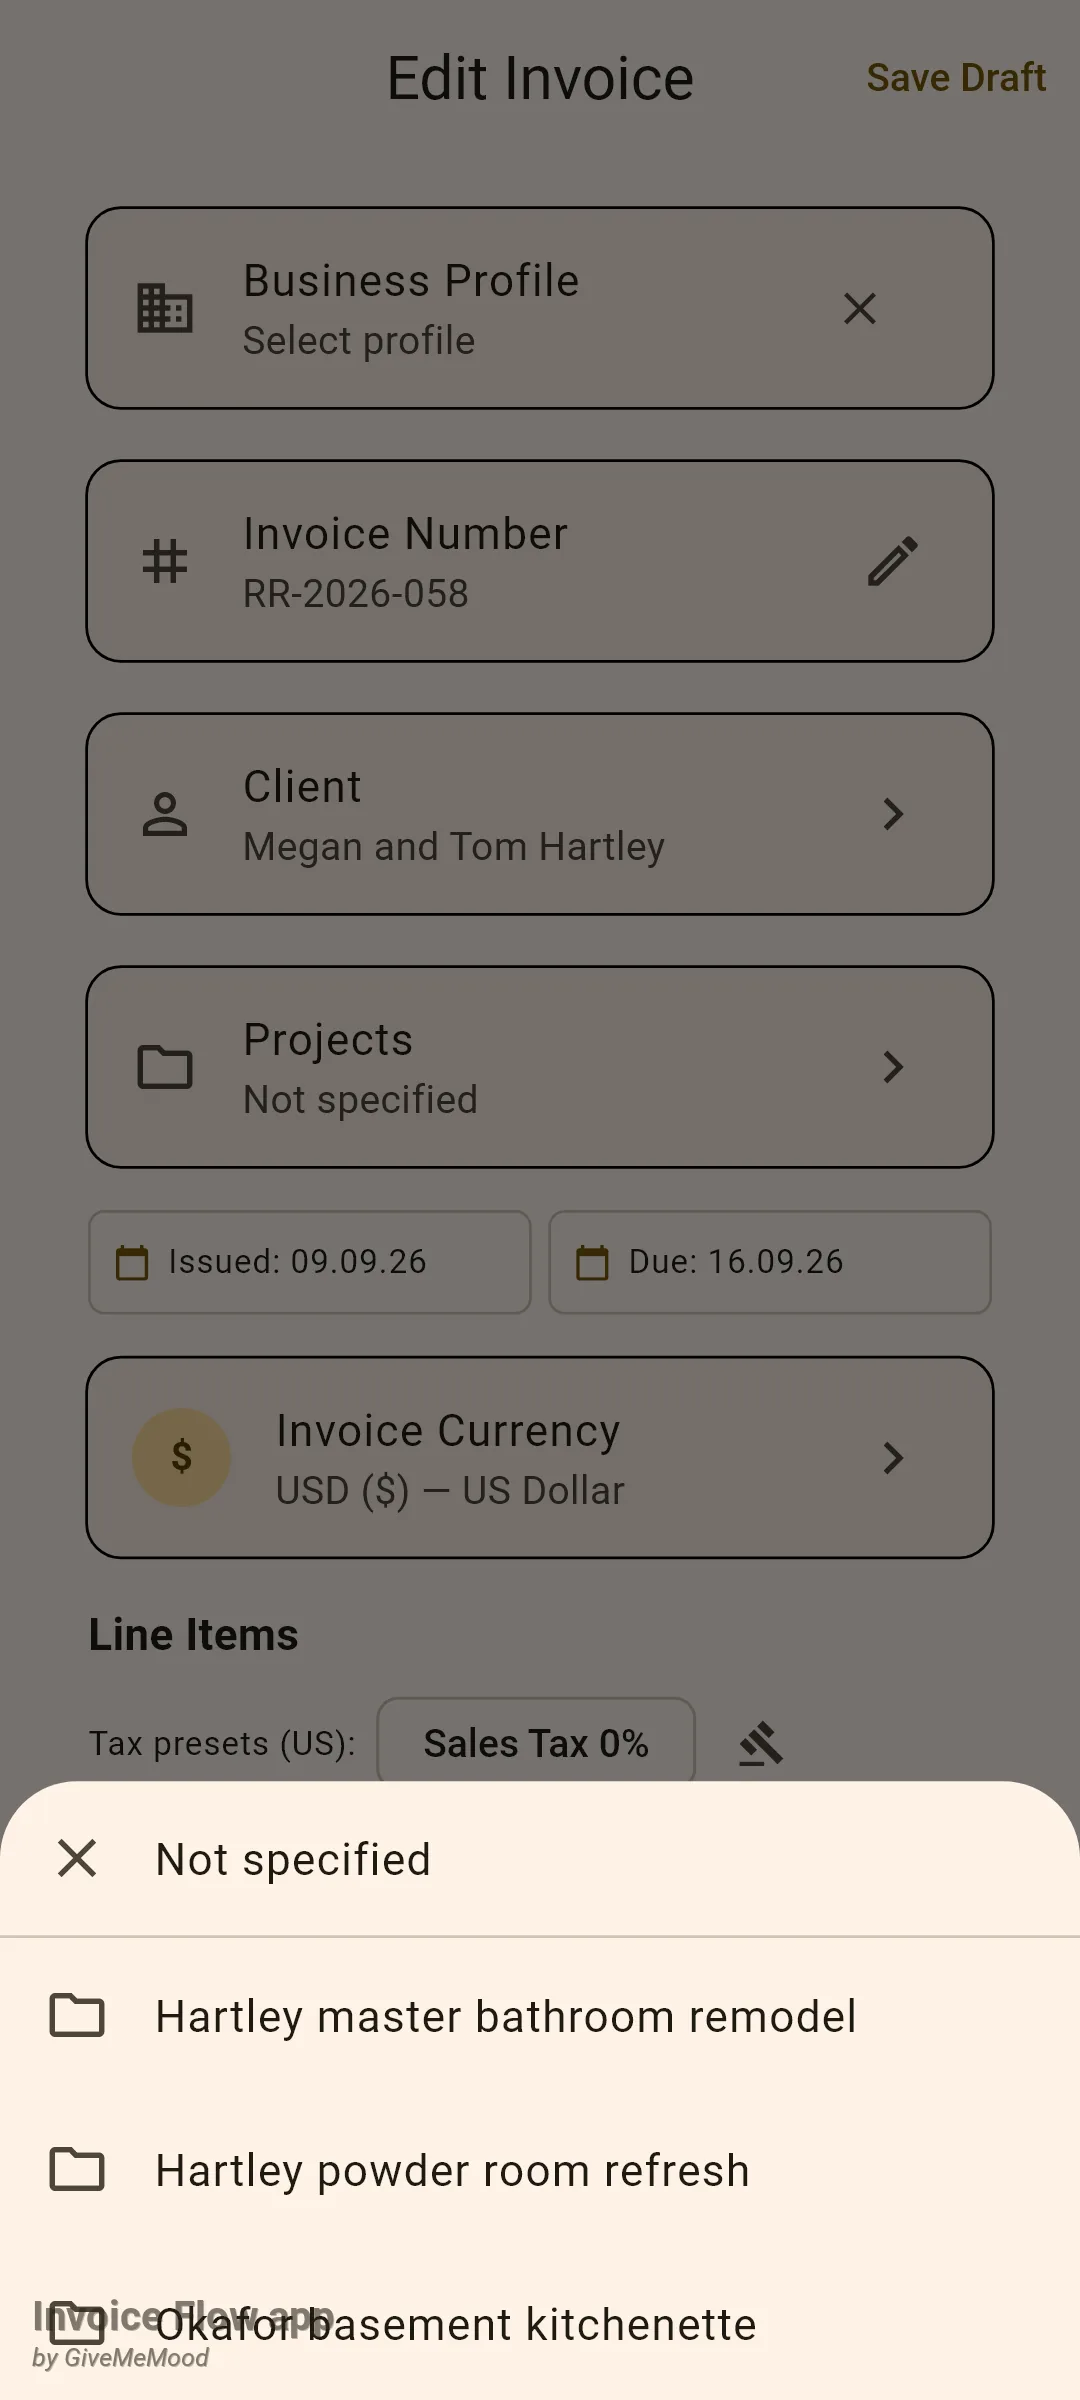
- Scroll to the Projects tile below the client. It reads Not specified until you pick something.
- Tap the tile. A sheet lists Not specified followed by every project on your business profile, not only the ones for this client, so read the names.
- Tap Hartley master bathroom remodel. The sheet closes and the tile now shows the project name.
- Finish the invoice and tap Save Draft (or send it). Saving is what writes the link and refreshes the project's totals.
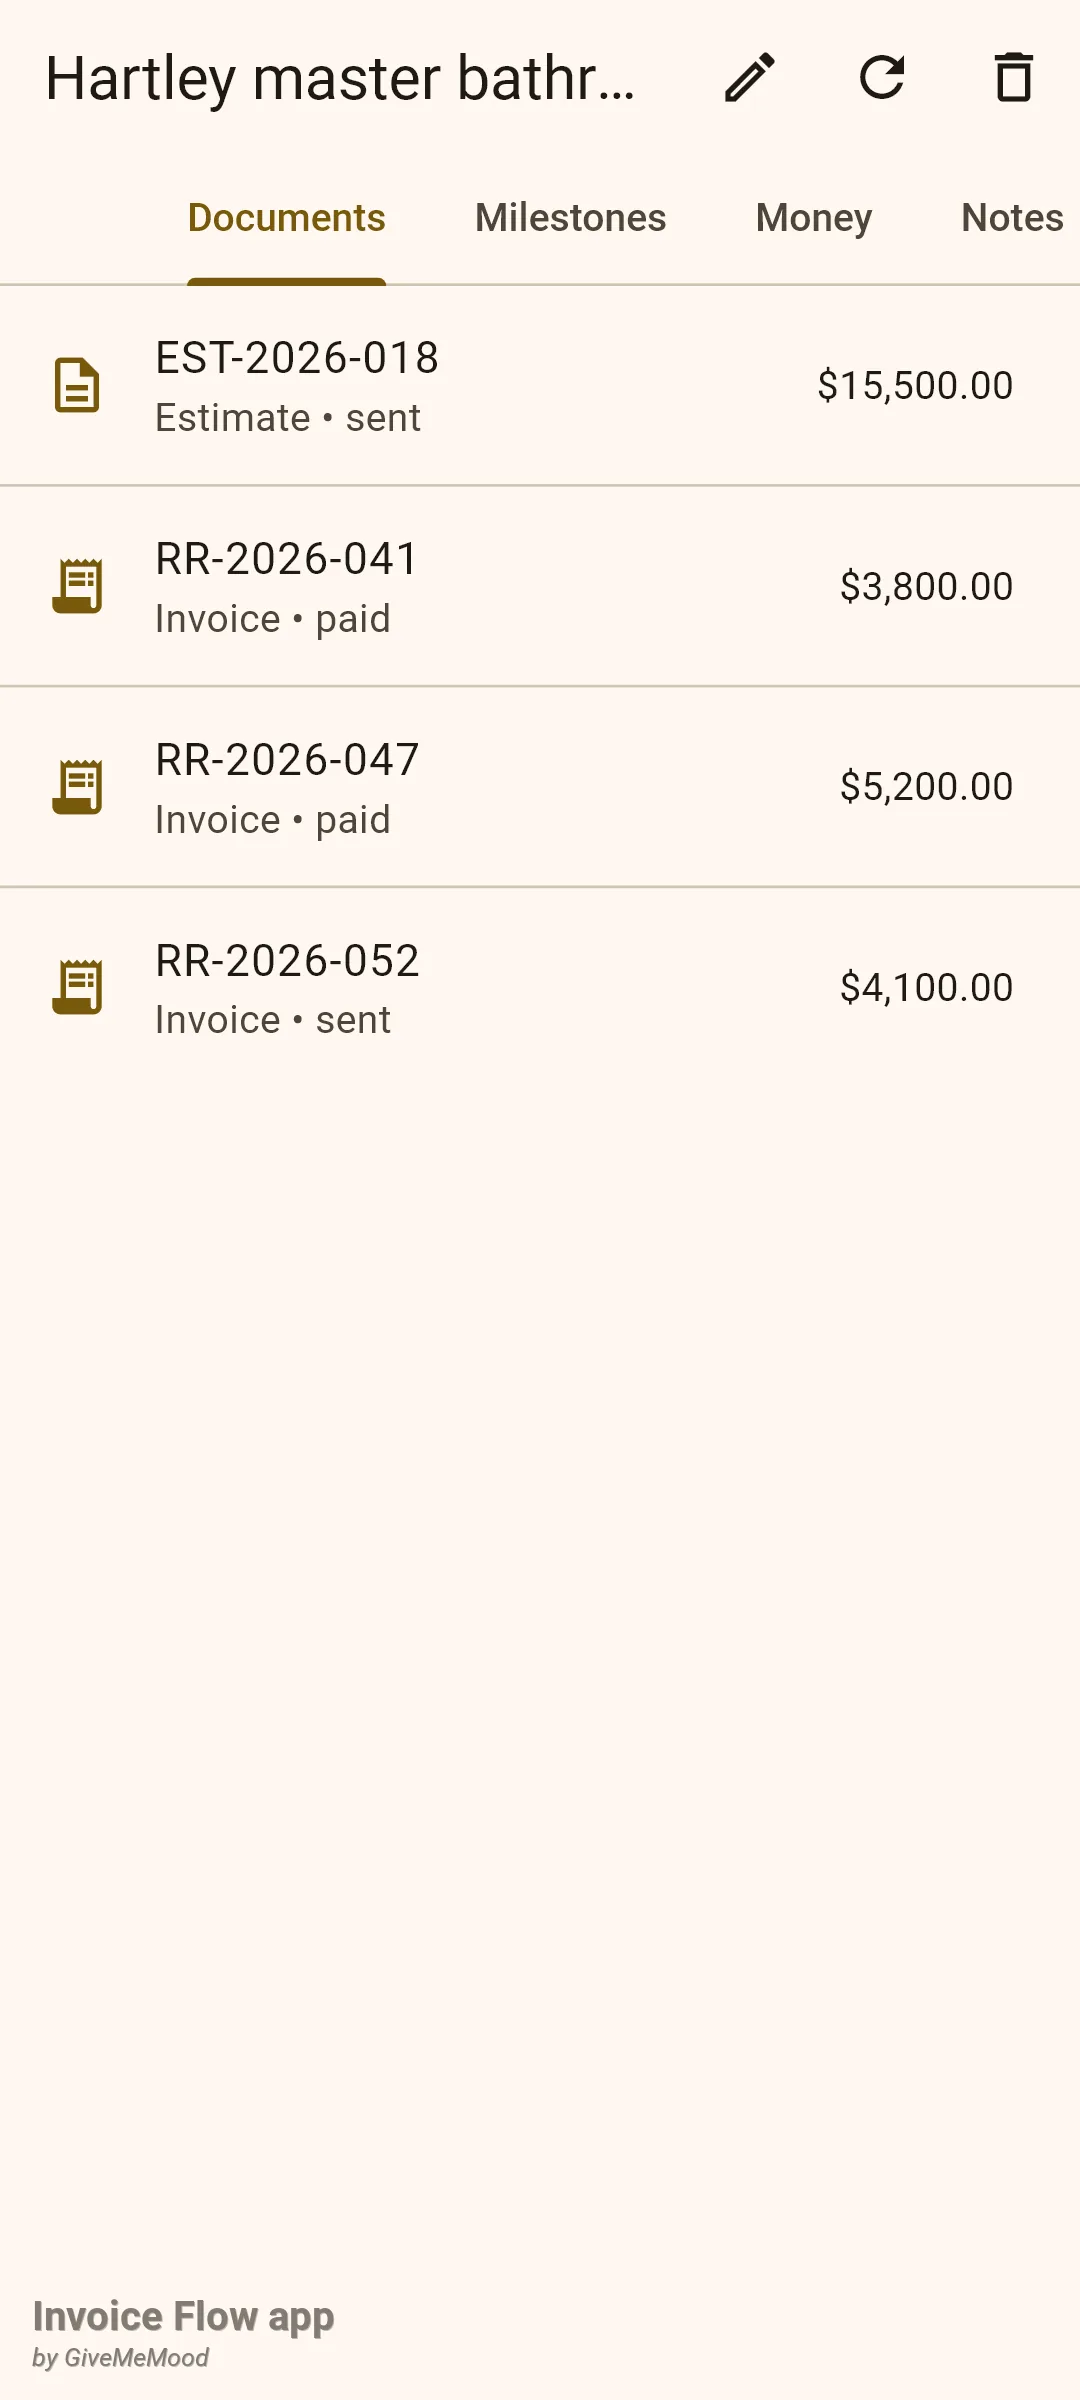
The same tile appears on estimates, so link the original quote too. Once it is linked, the project’s Documents tab shows the quote and each stage invoice in one list, and the Money tab knows the job’s estimated value.
How to read the progress
Open the project’s Money tab for the financial picture. The figures are computed from the linked documents, not typed by you:
| Row | How it is calculated |
|---|---|
| Estimated | Sum of the totals of linked estimates. |
| Invoiced | Sum of the totals of linked invoices (anything that is not an estimate). |
| Paid | Sum of the amounts recorded as paid on those invoices. |
| Remaining | Invoiced minus Paid: what clients still owe you on this job. |
| Remaining to invoice | Estimated minus Invoiced: how much of the quote you have not yet billed. |
Documents with status cancelled, declined or expired are ignored, so a rejected first quote does not inflate the Estimated line.
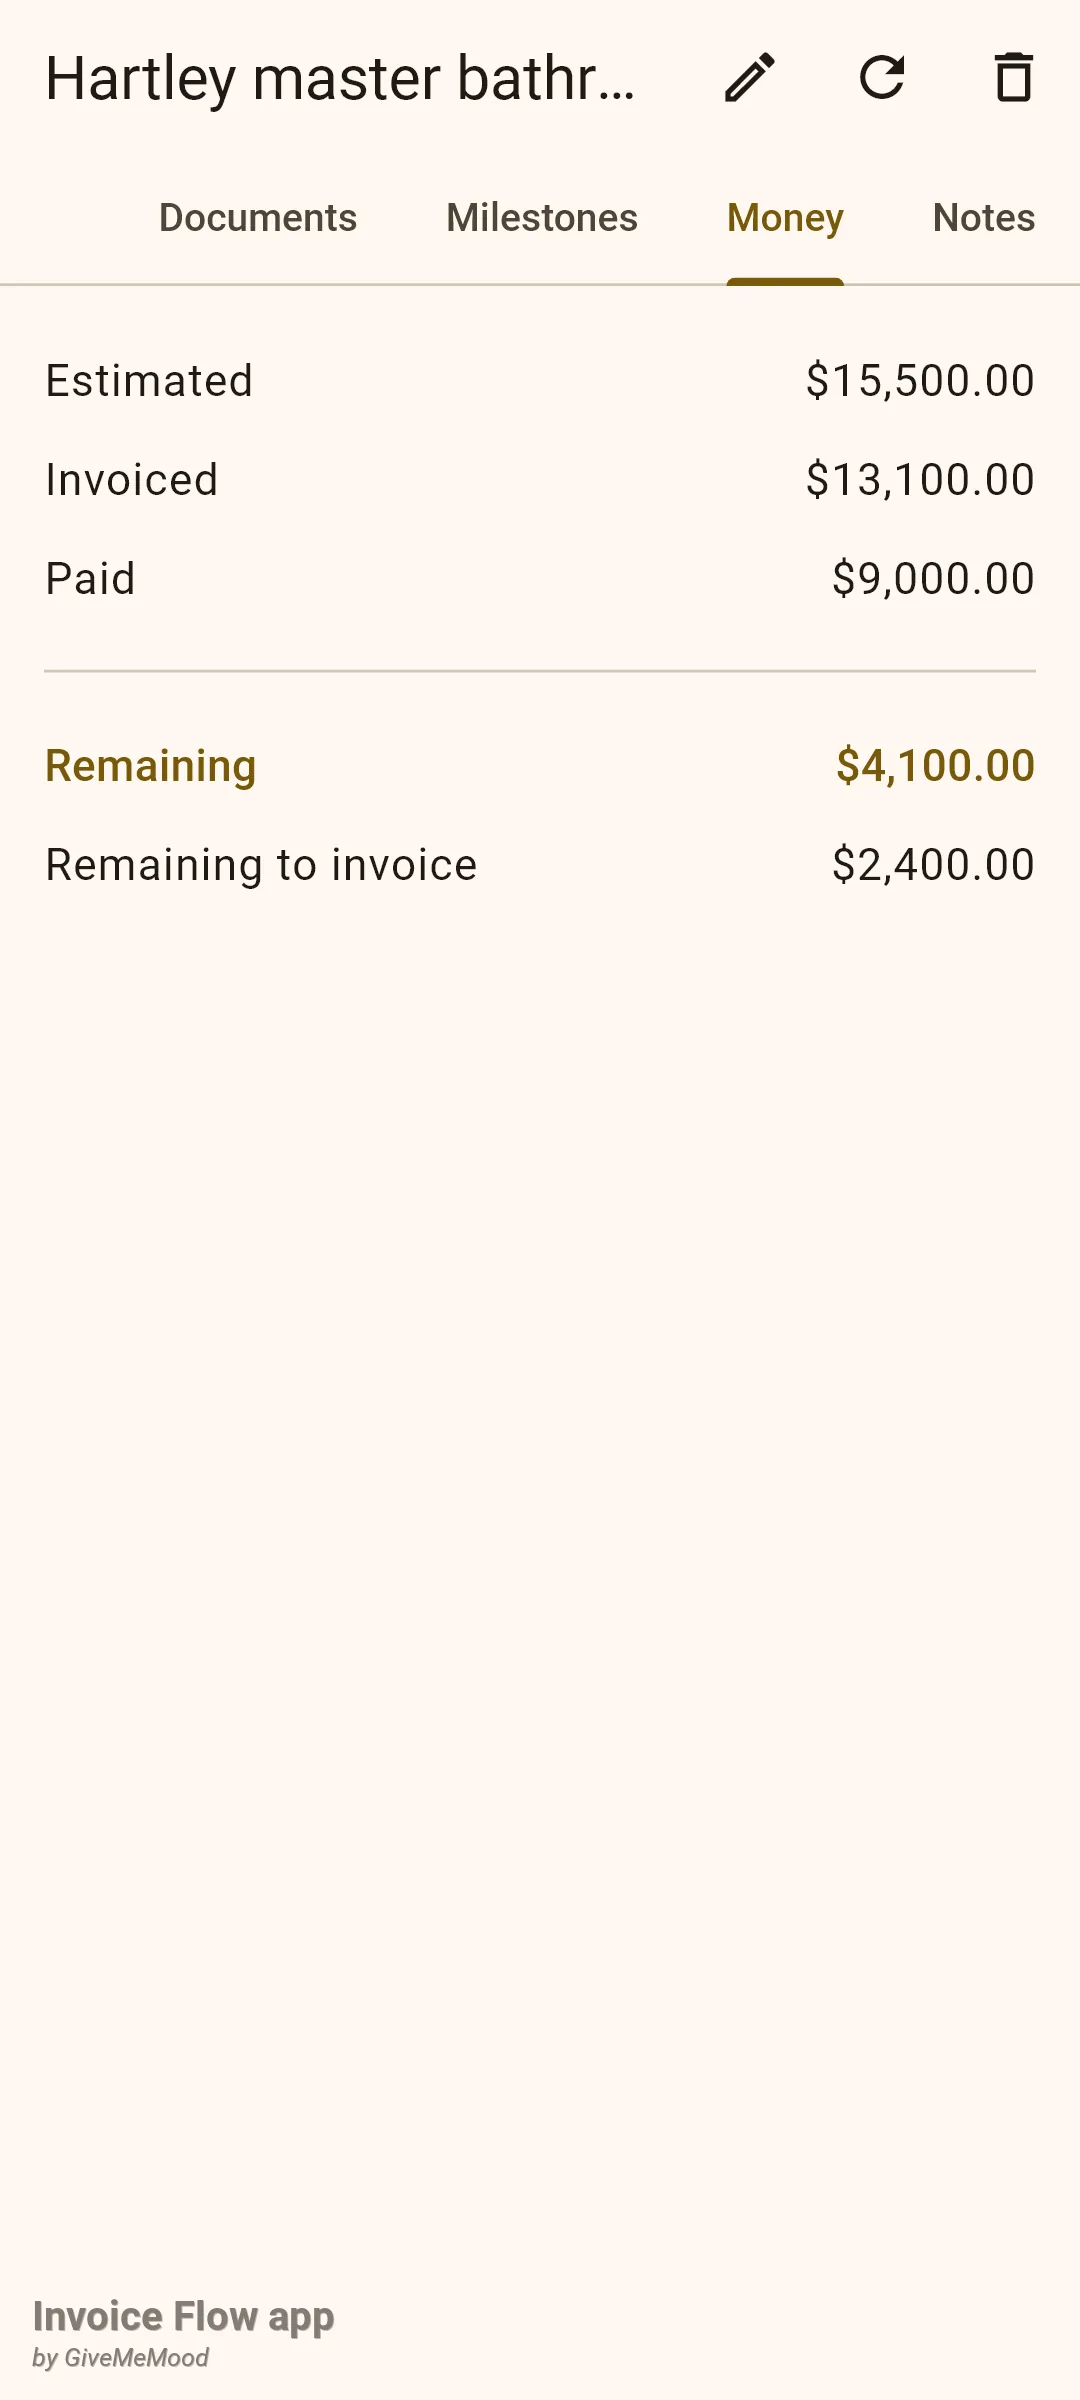
For the Hartley job this reads: $15,500 estimated, $13,100 invoiced across three stage invoices, $9,000 received, so $4,100 is waiting on the fixtures invoice and $2,400 (the final milestone) has not been invoiced yet. Combine that with the Milestones tab and you have both the schedule and the cash position of the job without opening a single document.
- Open the project and tap Money.
- If a figure looks stale, tap the circular-arrow icon in the title bar. The app re-reads every linked document and rewrites the totals; a short Money confirmation appears at the bottom.
- Switch to Milestones and mark the finished stage Done from its three-dot menu.
Rules and details
- One profile, one client. A project belongs to the business profile that was active when you created it and to at most one client. Deleting the client keeps the project but clears its client link; deleting the profile deletes its projects.
- Only the name is validated. Client, status and description are optional. Status defaults to Active.
- Statuses. Projects: Active, On hold, Completed, Cancelled. Milestones: Not started, In progress, Done, Skipped. Changing a milestone’s status from the three-dot menu records the start and completion timestamps; changing it inside the editor sheet only stores the status itself. The Skipped status is available in the sheet’s dropdown but not in the row menu.
- Milestone amounts are your estimate only. The Estimated figure on a milestone is not added into the project’s Money tab and no invoice is tied to a specific milestone. Use the project-level Money tab for real money and milestones for scope and schedule.
- Totals are cached. The Money figures and the amount shown on project rows are stored on the project and refreshed each time you save a document that is linked to it. Recording a payment or changing a status from the invoice detail screen does not refresh them; tap the circular-arrow icon on the project to recalculate.
- Currency display. Project totals are shown in US dollars unless a currency was stored with the project; the app does not currently offer a currency picker for projects, so if you invoice in another currency treat the Money tab figures as raw numbers.
- Empty milestone name. Tapping Save in the milestone sheet with an empty name does nothing; the sheet stays open without a message.
- Delete project. The bin icon asks you to confirm with the message “Delete “name”? Linked documents remain but are no longer grouped.” Estimates and invoices are untouched; only their project link is removed. Milestones are deleted with the project.
- Pro-only actions. Creating a project (the + button and the editor’s Save) and adding or editing a milestone via the Add milestone button require an active trial or subscription. Viewing projects, saving notes, recalculating totals and deleting are free.
- No client portal, no auto-billing. A project does not send anything to the client and cannot generate invoices on a schedule. If you want recurring stage invoices, see the recurring invoices guide.
Tips
Related guides
- Invoice editor for the full walk-through of the editor where the Projects tile lives.
- Estimates and conversion to turn the accepted quote into the first stage invoice.
- Payments and amount due to record stage payments so the project’s Paid figure is correct.